Reply With Quote
man, thats great work, looks better than most store bought setups...
 |
 |


Updated 50g by rickztahone, on Flickr
Got it through the door. I'm leaving right now but set it up to where it will eventually be located. I just inserted the hoses to get a feel for how they will be ran. The lily pipes on their way. There will be lily pipes on both sides.
I still need the LED's.
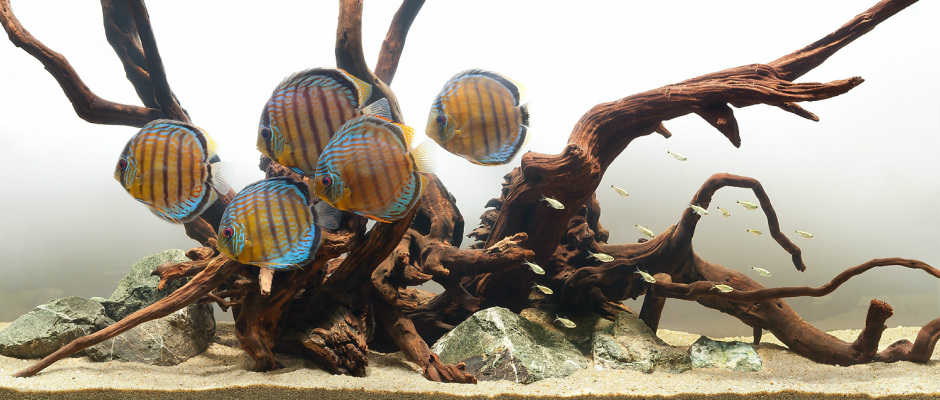
Unfortunately, I couldn't get 6"+ discus like I originally planned. I am getting some 5.5" APRT's from Josie so that means I will have to grow them out just a bit more, which means, no sand and no Driftwood for now.
Later, when they reach 6-7" I will include the DW and sand. That light isn't staying either. I got my eye on an LED one that should look nicer. I just had this one lying around.
Let me know what you think.
Last edited by rickztahone; 04-20-2014 at 10:02 PM.
Click here to view my 75g Acrylic Tank w/ Bean Animal Overflow with 40g Sump Thread
Also, click here for my 25 group of discus grow out thread
http://i3.cpcache.com/product/162117...ht=75&width=75
Want to look like Al did at his ACA talk with his white Simply Polo shirt?(You can catch Al's awesome Discus talk HERE)
You can get this and many more items such as T-shirts/Polos/hoodies/cups from our merchandise shop:
Cafepress.com
man, thats great work, looks better than most store bought setups...

Wow, beautiful set up. Can't wait to see it with fish. Great job, you should be proud.
Joan
Thank you very much. I initially thought about going store bought but I figured it wouldn't give me everything I wanted, so I did it myself.Originally Posted by triplecrown333

I am actually very proud. This is the largest and most time consuming DIY stand I have done thus far. Still waiting on the grommets to give it a more aesthetically pleasing look.
Here are a couple more shots:
Side View 50g by rickztahone, on Flickr
The hoses are being painted now for a more clean look.
Under the Stand xp2 xp3 by rickztahone, on Flickr
Got the heating covered and should be more than enough filtration. I got brand new media coming in, but Josie will also include a seeded filter in the order.
Click here to view my 75g Acrylic Tank w/ Bean Animal Overflow with 40g Sump Thread
Also, click here for my 25 group of discus grow out thread
http://i3.cpcache.com/product/162117...ht=75&width=75
Want to look like Al did at his ACA talk with his white Simply Polo shirt?(You can catch Al's awesome Discus talk HERE)
You can get this and many more items such as T-shirts/Polos/hoodies/cups from our merchandise shop:
Cafepress.com
looking good Rick
i found a couple of pics that are roughly the same size in that hard scape layout you like

and

your tanks looking great cant wait to see it finished
Scott
Wild Blue Discus
NW Victoria Australia
Planted-tank-aphile, Hobby Breeder and wild discus fan
Awesome Scott. For those that don't know, Scott's discus tank is the reason I chose to go in this clean style look. I saw his tank and fell absolutely in love with it. As I mentioned already though, I didn't get full adults so I can't scape the tank yet. I will let these guys put on some weight and size first and then add the sand and DW, which will be the only thing. I really hope Scott doesn't mind me linking to his photo here, but it is just me paying homage
Here is Scotts page for those interested:
http://wilddiscus.weebly.com/
Click here to view my 75g Acrylic Tank w/ Bean Animal Overflow with 40g Sump Thread
Also, click here for my 25 group of discus grow out thread
http://i3.cpcache.com/product/162117...ht=75&width=75
Want to look like Al did at his ACA talk with his white Simply Polo shirt?(You can catch Al's awesome Discus talk HERE)
You can get this and many more items such as T-shirts/Polos/hoodies/cups from our merchandise shop:
Cafepress.com
Lastly, Joan, I'm actually thinking of making a "light box" behind my tank as opposed to the "shadow box". I'm thinking of making it from styro or something similar that I can find at the local home improvement store. I'm thinking of placing the led's in there to light up the back. I wont know what this will look like till I do it but I ordered the LED's from Amazon for $24 or something.
Now for the actual LED fixture........got to keep saving for that.....
Click here to view my 75g Acrylic Tank w/ Bean Animal Overflow with 40g Sump Thread
Also, click here for my 25 group of discus grow out thread
http://i3.cpcache.com/product/162117...ht=75&width=75
Want to look like Al did at his ACA talk with his white Simply Polo shirt?(You can catch Al's awesome Discus talk HERE)
You can get this and many more items such as T-shirts/Polos/hoodies/cups from our merchandise shop:
Cafepress.com
Rigged up a drain system yesterday. I already had a 1 1/4 pvc pipe running to my front lawn. However, before, I would rely on a pump to get the water to the pvc pipe.
This setup allows me to use gravity as my siphon. I took the idea from the Rena filter siphon system and just made it bigger.
I fit everything in to place, without gluing it, just in case it didn't work, and at first it did not work. I pegged it to air leaking out somewhere and not creating enough of a suction. I believed the culprit was the hose to pvc outlet. I re-arranged the configuration so that there is a longer piece of pvc jutting out towards the tank, and inserted the hose in there. Lastly, one other thing that was not helping was that I was not filling up the pvc tube all the way with water. I needed 2 liters of water in order to get the water all the way up to the stand pipe. Once the water did get all the way up there, gravity did its thing as soon as I opened the ball valve.
On to the pics:
These were the parts I initially bought. I did not end up using 3 of them however. I thought that I would need the end part of the hose as well as the cap to hold the siphon at all times but I found that I will prefer to just remove the end piece of pvc whenever I am not doing a WC. This way there isn't something jutting towards the tank when it isn't in use.
Ball valve will be at the bottom where my 1 1/4" pvc is already located.
You can basically see here I did not end up using all the pieces connected to the hose.
Dry fitting them together
Everything is still dry fit. This is how the ball valve location looks. You can also see my water feed line though here. This will hopefully end up right next to the standing drain pipe.
Top of drain pipe. I ended up not using the piece connected to the hose and chose to go with the pvc only with the hose tucked in to it.
This is how the final product will look. Whenever I am not doing a WC I will simply remove the pvc piece that is jutting towards the tank.
Pretty straight forward drain system. No more relying on a pump to get the water out
Click here to view my 75g Acrylic Tank w/ Bean Animal Overflow with 40g Sump Thread
Also, click here for my 25 group of discus grow out thread
http://i3.cpcache.com/product/162117...ht=75&width=75
Want to look like Al did at his ACA talk with his white Simply Polo shirt?(You can catch Al's awesome Discus talk HERE)
You can get this and many more items such as T-shirts/Polos/hoodies/cups from our merchandise shop:
Cafepress.com

Very nice Rick and well done. I'll drill a hole thru my window just like yours watering my garden. Mine will be connect to 1" drain bulkhead on side oh the tank. What did you use to drill stucco in the other side?
««««««««««« please excuse smart phone poster error »»»»»»»»»»

Super nice rick. Impressive!
Discus dave.
If I remeber correctly I used a router. I just made sure there wasn't a stud or an electrical line.
Thanks for the compliment. It is coming along. I should have my fish shipped in the next couple of weeks. I still have to do a bleach run on the whole system.
Which reminds me, does anyone know if doing a bleaching on my tank (50g, this would be 5g of bleach) would be fine to dump in the front yard after I have added seachem safe? I don't want to ruin our plants flowers outside.
Thanks Dave!
Click here to view my 75g Acrylic Tank w/ Bean Animal Overflow with 40g Sump Thread
Also, click here for my 25 group of discus grow out thread
http://i3.cpcache.com/product/162117...ht=75&width=75
Want to look like Al did at his ACA talk with his white Simply Polo shirt?(You can catch Al's awesome Discus talk HERE)
You can get this and many more items such as T-shirts/Polos/hoodies/cups from our merchandise shop:
Cafepress.com

very lovely Rick ! i love seeing DIY projects run wild - so how do you start the drain system? you said gravity but do you just put the hose in there and off it goes? ! wow
- Marnie
www.bootcamprescue.com
Initially the draining part is started by loading water to the pvc stand pipe by way of screw cap at the top of the system. Close the ball valve, fill up, put cap back on, open the ball valve, and there you have a perfect drain!
Click here to view my 75g Acrylic Tank w/ Bean Animal Overflow with 40g Sump Thread
Also, click here for my 25 group of discus grow out thread
http://i3.cpcache.com/product/162117...ht=75&width=75
Want to look like Al did at his ACA talk with his white Simply Polo shirt?(You can catch Al's awesome Discus talk HERE)
You can get this and many more items such as T-shirts/Polos/hoodies/cups from our merchandise shop:
Cafepress.com
Ok, this next project is one that I really had no idea how it would turn out. I call it "the light box" and I honestly feel it turned out great, but I am yet to see it correctly placed and worked on a little more to refine the look. I basically just dry tested like I have been doing with everything else. Let me know what you think.
Bought a large piece of Insulfoam for like $7. Measured twice and cut once, lol.
Cut everything to size. In this case, the back of my fish tank dimensions.
This is how it will be siliconed together.
A two person job. I used toothpicks to hold things in place while I siliconed.
All glued up and ready to go.
I don't have a picture of it but when I initially placed the led strip on the flat surface of the lightbox it was just too obvious when mounted. I simply folded some paper over a few times so that it angled the leds towards the inside of the box. Worked out fine.
This is what I was talking above. You can see how the white paper angled the leds towards the inside.
Finished product. Unfortunately, the led strip wasn't long enough to cover the bottom but I don't think this will be a problem. If you are interested in the LED strip you can find it on Amazon HERE. It comes with its own power supply already. Plug and play
This is with only the lightbox on. You can obviously tell that this wasn't mounted properly. It was actually just propped on the top of the two corners. So, eventually, I will hang this on the wall, and the distance from the wall to the tank will diffuse the light even further.
This is with the light on as well. You might not be able to tell but the hanging light is actually pointed towards the back of the tank, exactly where the light box is. I haven't moved it to where the new fixture will be placed because the one coming in is smaller and I don't want to open new holes in the ceiling without having the light in hand.
Well, that is it for now. Tomorrow I will deal with cleaning up the edges and mounting it.
I still want to thank Joan because I kind of got the idea from the shadow box idea from the link provided. Put my own little turn on it.
Click here to view my 75g Acrylic Tank w/ Bean Animal Overflow with 40g Sump Thread
Also, click here for my 25 group of discus grow out thread
http://i3.cpcache.com/product/162117...ht=75&width=75
Want to look like Al did at his ACA talk with his white Simply Polo shirt?(You can catch Al's awesome Discus talk HERE)
You can get this and many more items such as T-shirts/Polos/hoodies/cups from our merchandise shop:
Cafepress.com
You're very welcome. Everything is coming out really, really well. I'm definitelygoing to have to try that myself at some point.
Joan
 Posting Permissions
 |