


 Reply With Quote
Subscribed.
Looking good Ricardo, if you do decide on angels go for proper ones
 |
 |


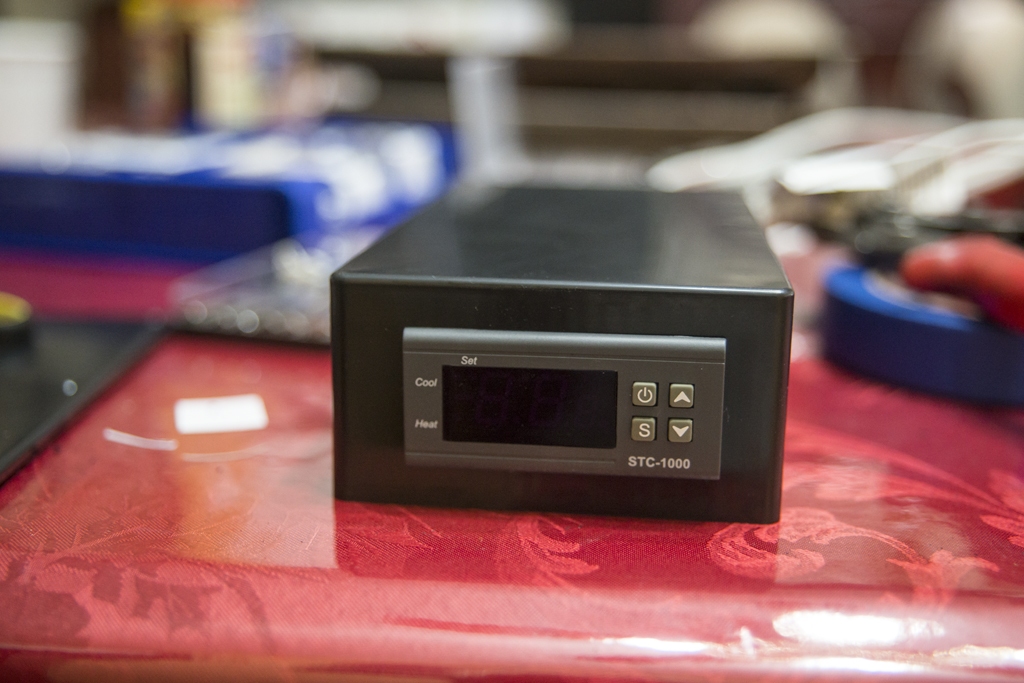
Thanks to Rick and his $20 controller thread, I was able to get my controller fully wired. I am yet to test it with my heaters plugged in, but I do not doubt it will work.
Had I not had to order a new Dremel because my other one broke, the project would have been right at, or close to $20 with the parts that Rick desribes. However, I chose to buy a project box and a couple of female plugs for aesthetics which pushed the project just a little bit higher. Overall, I am very happy about how it came out. I wish I would have had a smaller plastic disc to not over cut my slots for the female plugs, but I used what I had at hand.
Here are some pics from the progression of that project:
DSC02507 by SimplyDiscusPhoto, on Flickr
First I masked taped the project box and measured out where the controller would end up. I used the masking tape to preserve the finish on the project box.
DSC02508 by SimplyDiscusPhoto, on Flickr
Measured out the squares for the female plugs
DSC02509 by SimplyDiscusPhoto, on Flickr
Female plugs installed
DSC02510 by SimplyDiscusPhoto, on Flickr
and controller installed
DSC02511 by SimplyDiscusPhoto, on Flickr
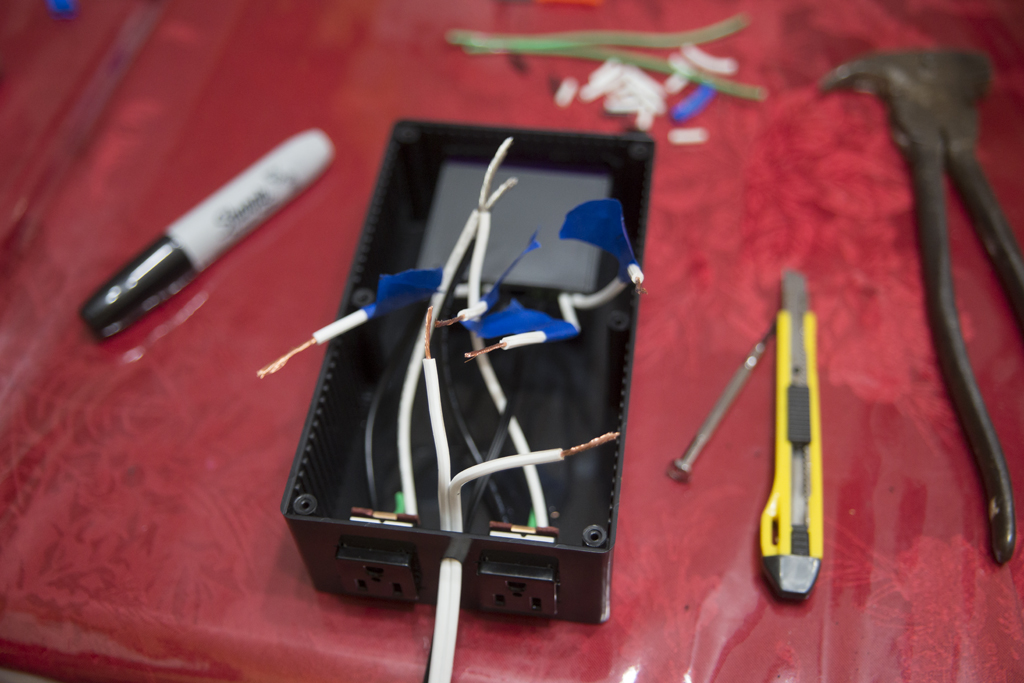
Now, to get started with the wiring. I used the same extension cord for the 4 pieces of wire the project calls for.
DSC02512 by SimplyDiscusPhoto, on Flickr
This part was a bit tricky because I wanted my controller to be oriented so that the plate that closes on the project box opens at the bottom. In order to do this, the screws that need to be screwed/unscrewed would be inaccessible. So, what I ended up doing was labeling each wire with the number it corresponds to so that I do not get confused while wiring this controller up. It worked just fine in this manner.
DSC02513 by SimplyDiscusPhoto, on Flickr
Everything tidied up and ready for power
DSC02515 by SimplyDiscusPhoto, on Flickr
And we have power!
DSC02516 by SimplyDiscusPhoto, on Flickr
Back side of box
Very easy to follow instructions, and very cheap to boot. Thank you to Rick for the thread step by step
Next, in the project is acquiring the acrylic to weld as a coast to coast overflow, and for the baffles in the sump. I will also be doing the plumbing at the same time. The most expensive part of the plumbing will be the gate valve ($50 ouch), and the actual pump, which I was just recommended one that is pretty cool. It allows you to throttle back and also has a feeding setting button where it will turn off, and turn back on after 10 minutes without you having to disconnect or connect anything back up.
Keep following for more updates.
Click here to view my 75g Acrylic Tank w/ Bean Animal Overflow with 40g Sump Thread
Also, click here for my 25 group of discus grow out thread
http://i3.cpcache.com/product/162117...ht=75&width=75
Want to look like Al did at his ACA talk with his white Simply Polo shirt?(You can catch Al's awesome Discus talk HERE)
You can get this and many more items such as T-shirts/Polos/hoodies/cups from our merchandise shop:
Cafepress.com

Subscribed.
Looking good Ricardo, if you do decide on angels go for proper ones
Paul
Comfortably numb.
I plan on reaching out to Bill or getting some directly from Carol Francis. I've spoken to her in the past and she is such a great person to speak to. I hope to do business with her if I ever make up my mindOriginally Posted by pcsb23


Click here to view my 75g Acrylic Tank w/ Bean Animal Overflow with 40g Sump Thread
Also, click here for my 25 group of discus grow out thread
http://i3.cpcache.com/product/162117...ht=75&width=75
Want to look like Al did at his ACA talk with his white Simply Polo shirt?(You can catch Al's awesome Discus talk HERE)
You can get this and many more items such as T-shirts/Polos/hoodies/cups from our merchandise shop:
Cafepress.com
Ok, I finally sat down with some graphing paper and planned out my Bean Animal outside overflow box:
Bean Animal Overflow.jpg
This shows roughly what it will look like. I only plan on tweaking the siphon line a little and raising it closer to the Open channel line
Next I tried to plan out my sump, but baffles still baffle me (yeah, I went there with the cheap pun). I do not believe Baffle C and Baffle D are correctly oriented, so some advice from those in the know please chime in.
Sump Side View.jpg
Sump Top View.jpg
I plan on putting ceramic media in panty hose and sitting on top of the egg crate help up by pvc short stacks. As I mentioned, I believe the baffles may be backwards, and I am not sure if the baffle heights give off the correct water level I want. If anyone sees anything glaringly wrong, please let me know.
Click here to view my 75g Acrylic Tank w/ Bean Animal Overflow with 40g Sump Thread
Also, click here for my 25 group of discus grow out thread
http://i3.cpcache.com/product/162117...ht=75&width=75
Want to look like Al did at his ACA talk with his white Simply Polo shirt?(You can catch Al's awesome Discus talk HERE)
You can get this and many more items such as T-shirts/Polos/hoodies/cups from our merchandise shop:
Cafepress.com

Very nice Rick. As far as sump, i think baffles C&D are high or middle chamber to big which doesnot give much water volume to fill up 1+ inch of main tank and cycle back to sump. Last chamber will run out water quick not include evaporation. If you fill sump up to height of baffles, then you dont have much room in case back flow from main tank when pump off or out of power. Make sure your return nozzle above water line before pump on and check valvle may help too.
Are you going to fill up middle chamber with media? If it was me, i make middle chamber smaller or lower baffles. Plus move sponge to milddle chamber on the above eggcrate, it will be easy to take out to clean it. Also i'll put 1 more sponge before pump to make sure crystal clear retun water and prevent stuffs may damage pump.
Hth
Tony
I was thinking the same thing about C&D. I was thinking of lowering them as well. However, I did want a large middle section for a lot of cermic media. I was thinking of doing K1 initially but changed my mind due to price and scared of lack of design. I was thinking of possibly doing like Joey did and make a baffle with 2 pipes with slits, but again, I'm really on the fence about it.
I'm not sure if I understand your 1"+ remark. The Bean animal overflow setup makes it so that I do not have to worry about the tank water level. Only the sump level with decrease which is why I want a large return pump section as well. The back flow will only be about 5g from my calculations which this setup will be able to handle. Also, no check valve needed because of the way the bean animal setup is done. The coast to coast weir can not give off more water than the 5g I mentioned prior.
Click here to view my 75g Acrylic Tank w/ Bean Animal Overflow with 40g Sump Thread
Also, click here for my 25 group of discus grow out thread
http://i3.cpcache.com/product/162117...ht=75&width=75
Want to look like Al did at his ACA talk with his white Simply Polo shirt?(You can catch Al's awesome Discus talk HERE)
You can get this and many more items such as T-shirts/Polos/hoodies/cups from our merchandise shop:
Cafepress.com
To me 5 gallon is pushing it beacuse water evaporate really quick and pump will run dry in couple days. Unless you top it off or frequent wc.
Base on your pic, last chamber water volume up to baffle 15×15x10H minus 4"H for pump before get dry. So you have 15x15x6"H ~ 5.7gallon fill main tank and return pipes.
Side note : back flow can come from returned hose depends on position.
I am thinking of doing an ATO so that would eliminate the worry of running dry.
Click here to view my 75g Acrylic Tank w/ Bean Animal Overflow with 40g Sump Thread
Also, click here for my 25 group of discus grow out thread
http://i3.cpcache.com/product/162117...ht=75&width=75
Want to look like Al did at his ACA talk with his white Simply Polo shirt?(You can catch Al's awesome Discus talk HERE)
You can get this and many more items such as T-shirts/Polos/hoodies/cups from our merchandise shop:
Cafepress.com
Barely happened by this, great work rick! Now for me to head into class....
So I had to adjust my external overflow measurements/sizes. I'm doing the measurements here at work so I could only get a pdf file to load rather than a viewable jpeg, my apologies.
The goal here is to have the water level line even in both the internal overflow box and the external one. In order to do this, I have to tweak the full siphon line in order for the water line to stay in the center of the drilled holes in the back of the glass. You do this with a ball valve, or in my case, a gate valve which has more precise control. The goal is to throttle back the full siphon just enough so that the OC (open channel) line will get a very small percentage of water flowing down that pipe. The pipes below the bulkheads will be 1.5" for the OC and emergency but not the full siphon. This setup should be able to push about 1,200GPH. I will not be flowing that much through this tank, and accounting for head loss, pvc bends and baffles and such, I am looking to be right around 500-600gph.
My sump design is all ready to go as well. I just need to go out and buy some 1/4 acrylic and buy the weld on #4 & #16
Hole Placement Measurements.pdf
Plumbing Layout.pdf
Click here to view my 75g Acrylic Tank w/ Bean Animal Overflow with 40g Sump Thread
Also, click here for my 25 group of discus grow out thread
http://i3.cpcache.com/product/162117...ht=75&width=75
Want to look like Al did at his ACA talk with his white Simply Polo shirt?(You can catch Al's awesome Discus talk HERE)
You can get this and many more items such as T-shirts/Polos/hoodies/cups from our merchandise shop:
Cafepress.com
So I ended up scrapping the DC 4000 pump idea. I just read too many mix bag reviews and I'd rather not deal with that. I ended up with an Eheim 1260. I was going to go with the Eheim 1262 because it was only $5 more (currently on sale online) but I figured it would be too much flow. Inintially, my plan for the DC 4000 was to ramp it down from its 1k rating. With the Eheim, being that it isn't adjustable, I figured I'd dial in what I am actually aiming for in GPH. This being a 635wpg, I figure after head loss at roughly 3' and plumbing plus sump restrictions I am looking at roughly 500gph. This would put me at roughly a 6 turn over rate for my tank.
I don't like that it is a 5/8 barb connection and am hoping that it will be a threaded top pump so that I can soft plumb and then transition over to hard plumb over the tank.
Click here to view my 75g Acrylic Tank w/ Bean Animal Overflow with 40g Sump Thread
Also, click here for my 25 group of discus grow out thread
http://i3.cpcache.com/product/162117...ht=75&width=75
Want to look like Al did at his ACA talk with his white Simply Polo shirt?(You can catch Al's awesome Discus talk HERE)
You can get this and many more items such as T-shirts/Polos/hoodies/cups from our merchandise shop:
Cafepress.com
Forgot to add these pics of my progress on the sump:
Overflow and Sump_4.JPG
This is where my Bean animal overflow will reside. The line running across the back of the tank is the line where the bottom internal panel will be.
Overflow and Sump.JPG
Overflow and Sump_2.JPG
Overflow and Sump_1.JPG
Overflow and Sump_3.JPG
Click here to view my 75g Acrylic Tank w/ Bean Animal Overflow with 40g Sump Thread
Also, click here for my 25 group of discus grow out thread
http://i3.cpcache.com/product/162117...ht=75&width=75
Want to look like Al did at his ACA talk with his white Simply Polo shirt?(You can catch Al's awesome Discus talk HERE)
You can get this and many more items such as T-shirts/Polos/hoodies/cups from our merchandise shop:
Cafepress.com
I purchased the blade to cut the acrylic and it turns out it won't work how I thought it would on my table saw. My curren Skill Saw will only take a 6" disc, so I asked my brother in law to see if he can source a 10" discus Skill Saw. He's a construction worker and my father-in-law is a foreman so I'm sure between the both of them I can source a Skill saw that will take a 10" blade, lol.
Still, it sucks to have to wait even more time to get this show on the road. I have most of the stuff I need, but not having the plumbing in place is really slowing down this project.
Things I still need to purchase:
3D background
Paint for inside stand and 2x4's to structurally make this thing more sturdy.
DJ Electrical stip and probably some kind of flush mount electrical sockets.
I still need to actually buy all of the pvc pieces, but I have had them saved in the cart all this time and know what I need. That's around $100 in plumbing
Still need to buy the 2 hole saw bits for bulkheads
In short, still not even half way there. Not sure why I am putting so much work in to this tank as it will simply be a grow out, but I tend to always overbuild, overspend and simply overcomplicate these darn builds, lol.
Had I been smart, I would have paid for tank/stand, used my xp3's I already had on hand, no background, BAM, grow out tank! lol. Somehow I always seem to overcomplicate stuff.
Click here to view my 75g Acrylic Tank w/ Bean Animal Overflow with 40g Sump Thread
Also, click here for my 25 group of discus grow out thread
http://i3.cpcache.com/product/162117...ht=75&width=75
Want to look like Al did at his ACA talk with his white Simply Polo shirt?(You can catch Al's awesome Discus talk HERE)
You can get this and many more items such as T-shirts/Polos/hoodies/cups from our merchandise shop:
Cafepress.com

This is going to be one heck of a grow out tank!! Can't wait to see it come together.
Most of my tanks have started as grow out tanks, but with a full display end game in mind. This one apparantly is no different. Even with my 56g bowfront, I knew where I wanted to go with it, it was just unfortunate that I started with a tank too small. You'd think I'd know better considering how many times I have told people to not start off with 55g tanks, lol.
Either way, I eventually plan on having a sand bottom, DW (which I already have) and low light plants (this has a very low chance of being done though) and floaters to block some light and create shaded areas. Not necessarily a biotope display but definitely a low light tank possibly with some kind of tannins.
If I get my hands on a large Skill Saw, I plan on getting these pieces cut for the baffles and overflows. I already have the weld on 4 and 16 on hand. I hate having parts just sitting around, lol.
Click here to view my 75g Acrylic Tank w/ Bean Animal Overflow with 40g Sump Thread
Also, click here for my 25 group of discus grow out thread
http://i3.cpcache.com/product/162117...ht=75&width=75
Want to look like Al did at his ACA talk with his white Simply Polo shirt?(You can catch Al's awesome Discus talk HERE)
You can get this and many more items such as T-shirts/Polos/hoodies/cups from our merchandise shop:
Cafepress.com
 Posting Permissions
 |

