

 Reply With Quote
I love it! Designed really well and executed. With the PVC shavings i can imagine ure doing bio filtartion with the wet dry, are you doing mechanical filtration with the attached 305 or is it an extra step to water polishing?
Angel
 |
 |


Did lot of looking never could find a w/d that did what I wanted.
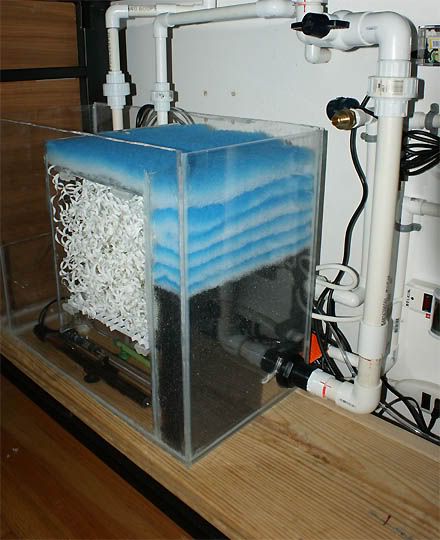
Made from 1/4" acrylic from Lowes and silicone to glue everything together.
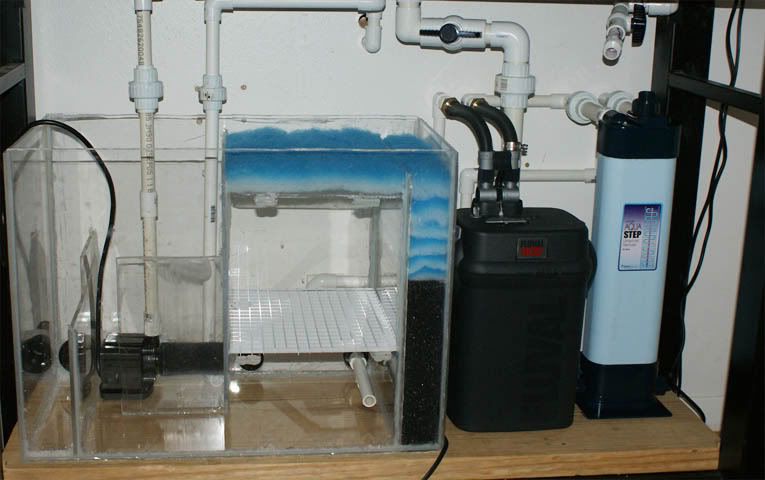
Water comes in the bottom of the side.
Flows up thru sponge filters
into drip tray and thru media.
Under the drip tray it feeds thru bulkhead fittings to a Fluval 305
and then thru a 25W UV sterilizer for that extra kick.
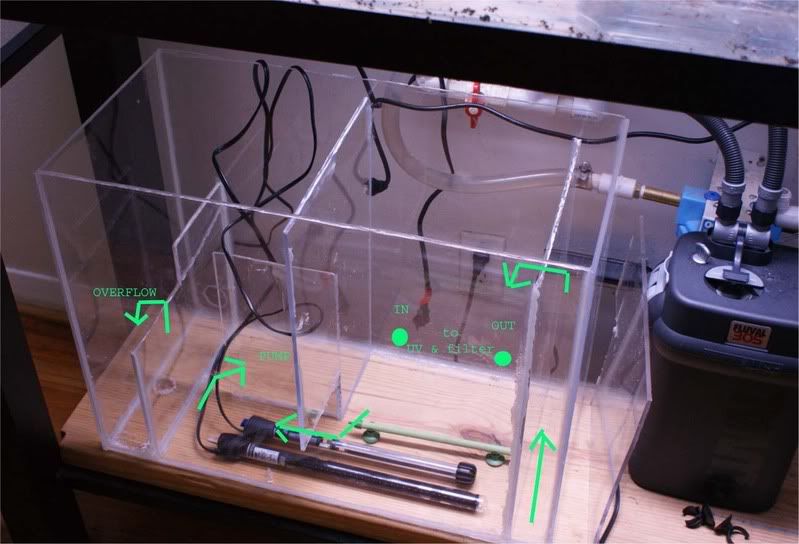
Baffling to the pump insures a good flow pattern over the heaters
and toward the overflow area.
As new water is add next to the pump, old water will overflow
insuring 100% of new water is picked up by pump and sent to the aquarium.
The overflow area runs out thru the wall behind the aquarium into the
garage into a small sump tank, where a sump pump with float switch will pump
waste water to a drain on other side of garage.
Water changes will be completely hands off and automated
Cost about $150 to make
Last edited by rbarn; 03-17-2009 at 04:31 PM.

I love it! Designed really well and executed. With the PVC shavings i can imagine ure doing bio filtartion with the wet dry, are you doing mechanical filtration with the attached 305 or is it an extra step to water polishing?
Angel
ThanksOriginally Posted by sriangel

I had the 305 already so figured couldnt hurt to have it running too.
It will have it 50% bio-media and 50% extra water polishing pads.
It also gives me a pump to run thru the UV light with.

This awesome. So water flows from the tank in the wet dry then thru the wet dry into the 305 and the tank as filtered water. Am I understanding the flow correctly?
When does the overflow come into play? and I am assuming overflow is connected to the discharge or sewer.
Ashay Sathe
Always two there are, no more, no less: a master and an apprentice.
Blog: http://vrsathe.blogspot.com/
The 305 returns its water right where it picks it up from.
Its just picking up water already gone thru the bio-media and on its way
to the pump an extra run thru the canister and UV light.
The baffling around the pump insures a good one way flow thru the sump
area.
The new water feed will add water to the baffled area the pump is in.
As new water is fed into the sump more water is coming in then before and water level
will rise. As water rises it will overflow and drain out the back thru some
PCV and thru the wall into the garage for sewer drain.
Since I baffled the pump to make it flow "past" the overflow area before getting
to the pump, only old water will overflow.
To make sure I understand - water out from the tank goes into the wet/dry thru bio filteration. The next step it is sucked in the cannister goes thru mechanical filteration output into the UV and fed back to the wet/dry output to be pumped in the tank.
Is this correrct underrstanding?
This is where I am getting confused, are you pumping in new water from water source into the area that has water that being output after going thru bio and mech filteration? So your bio and mech fitered water and new water mixes and then a portion of the mixed water goes in your fish tank and portion drained out?
Ashay Sathe
Always two there are, no more, no less: a master and an apprentice.
Blog: http://vrsathe.blogspot.com/
Correct. Some water bypasses the canister but its just a added bit of filter
so it doesnt have to get 100% flow thru it.
I set-up a "flow" thru the sump that goes past the overflow to the pump.
New water is added right next to the pump in that small baffled pump area.so the new water cant "back flow"
to the overflow area. Only old water will overflow.
As I pump more water into the sump it will cause the level to rise, but the
forward flow to the pump will not stop. So only thing that can overflow is old
water. 100% of mixed new water goes to the tank. Old water only overflows after
coming from tank and going thru bio-media but before it makes the turn into
the return pumps baffled area.

I thought you need the special adhesive for acrylic, not silicone? Its a clear Dow glue for acrylic. Not sure of the mechanics of upflow through the mechanical pads either or how power failures or suction breaks will affect it, but it is a novel idea, it just sems backwards against logic and gravity??
Mark
The silicone is not as good as liquid welding the Acrylic, but it works.
I put clear packing tape that you cant see in pics on all the outer edges too.
This should give it a film across the corner joints to help keep the silicone from separating.
Ok its a gravity feed from homemade internal overflow in the tank.
The internal overflow baffle is the key. It was easy to make too, with some
acrylic, a blow torch and table edge to bend it on.
The pump pumps extra water into tank, that overflows and runs down with
gravity to the w/d
If pump cuts out, extra water stops going to the tank and it stops
overflowing. No worries on runway siphons.
As gravity pushes water into first sponge area it has no where to go
but up thru the sponge. The column of water coming down from the
overflow will always be highest point and water will flow down from it.
Again the whole system stops if the pump stops pumping extra water
into the tank. The return pipe is fixed at top of the tank, so the most that
could siphon back thru it is the top 1 inch of water.
Last edited by rbarn; 03-18-2009 at 03:53 PM.
I like the design. I like the setup. I like the water flow. I don't like the silicone/acrylic combo. Eventually, I think a seam will fail. Silicone just doesn't work well with acrylic. I'm not saying build it over, but I would watch it carefully. Maybe next time, you could try an acrylic solvent. Weld-On 4 has been my choice for 1/4 acrylic. If you can't find any locally, Methyl Ethyl Ketone, Acetone, and Acetic Acid are all good solvents for plexiglass. Creative design and good work. Post up some pics of it full of water and running.
Last edited by salth20; 03-19-2009 at 12:48 AM.
Kickin' it old school.
90 gallon acrylic tank.
Summit Aquatics trickle system with Dupla Biokaskades.
Lifegard mechanical and chemical modules. DIY coil denitrator.
Thanks, not thrilled with using silicone either. But this was more of a first
try at something like this and didnt want to have to mess with getting every
seam absolutely perfectly straight and squared so that edges would bond/weld properly.
If it ever leaks I'll remake it "the right way"
This is going to be a long project getting up and running so watch for
posts. Going to be 100gal super high tech planted Discus tank.
Full multi parameter AquaController III system with all the bells and whistles.
I've got some really good ideas, yall should love this.
New ideas are great and fun to watch. I use a trickle tower wet/dry and change the filter pad each week. Since the water flows down through the padding all the gunk stays put when I remove it. Due to your flow upwards won't all the mechanically filtered stuff fall all the way to the bottom when you break the flow to clean? Or when you stop the wet/dry each night to do water change, clean the prefilter and syphon the sludge from the media at the bottom of the filter?
Last edited by MSD; 03-19-2009 at 01:35 PM.
Mark
Good catch.
I'm going to drill a hole in the bottom of the pre-filter area and thru
the wood below and install a bulkhead fitting.
Run some PCV under the w/d with a ball valve and 3/4 garden hose hook-up
underneath. just hook up hose and drain and clean pre-filter area without
contaminating bio-media.
Post some pics this evening.
also, nice thing about my set-up is I dont have to turn anything off for cleaning
or water changes.
Everything will stay running and be COMPLETELY automated, from PH and Co2 control, water changes,
temp control, light control, pump control and cooler control (cooler might be needed, damn water comes out the tap at 85+* down here in summer)
Everything custom, from stand to lights to filter to controller computer.
http://www.aquacave.com/detail.aspx?ID=2356
Last edited by rbarn; 03-19-2009 at 12:25 PM.
Anything that can lessen work and be make automatic is a good thing! Keep it as simple and foolproof as possible. Too bad I have no engineering skills to build original designs.
Mark
I don't want to rain on your parade and you have a very good design concept but having built a number of these the only thing saving your box from complete failure is the strength of the tape on the outside. The silicone will stay sealed if nothing moves but any movement and the silicone will not adhere to the plastic. Not only will it leak but the sides could potentially blow apart if too much water ends up inside. Time is your enemy. The glue on the tape will probably degrade over time and the sides could start to slip. I use Weldon #16 solvent cement for acrylic. It is a thick quick drying easy to use glue that fills voids in joints and is very strong when cured. If you decide to build another give it a try. You can have confidence that it will not come apart and if you do have a leak you can go over the joints again and again until you fill the leaks.
 Posting Permissions
 |
