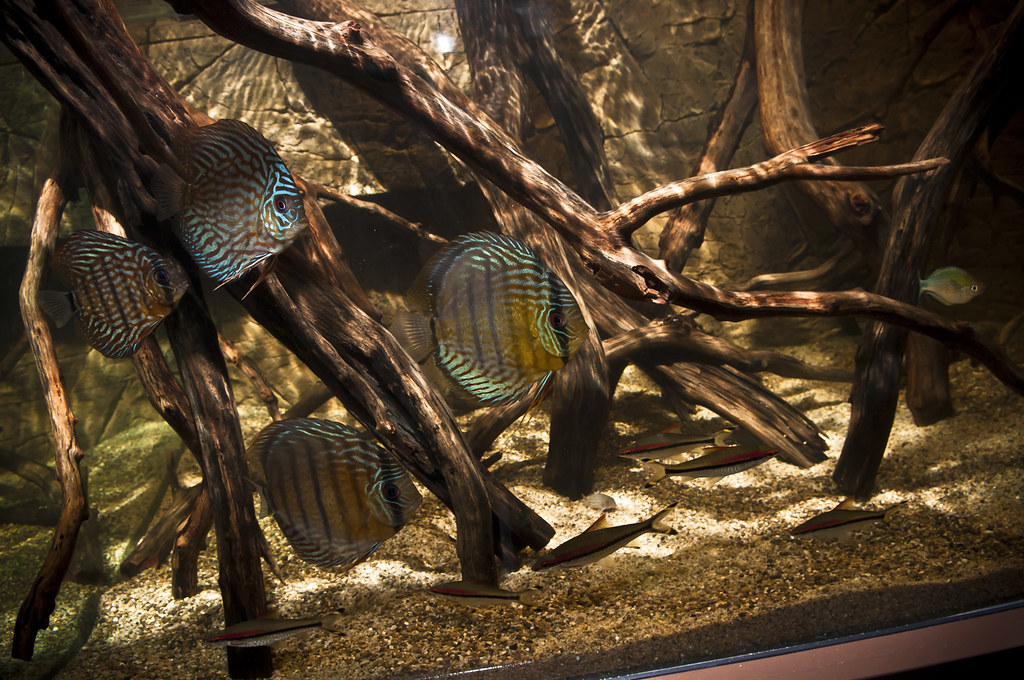
Well after several weeks on this tank it is finally finished!!! I picked this tank up at the end of January and have been working on it nonstop. I put a lot of thought and planning into this one. In fact, this is my most intense tank build yet. Lots of DIY work, made the setup of my old 400g seem like a breeze. This tank will be home mainly to my wild discus. I went for a biotope-ish setup, even though I have a few fish that arent truly native to where the discus are from. Enough of that, on to the details!
TANK/STAND
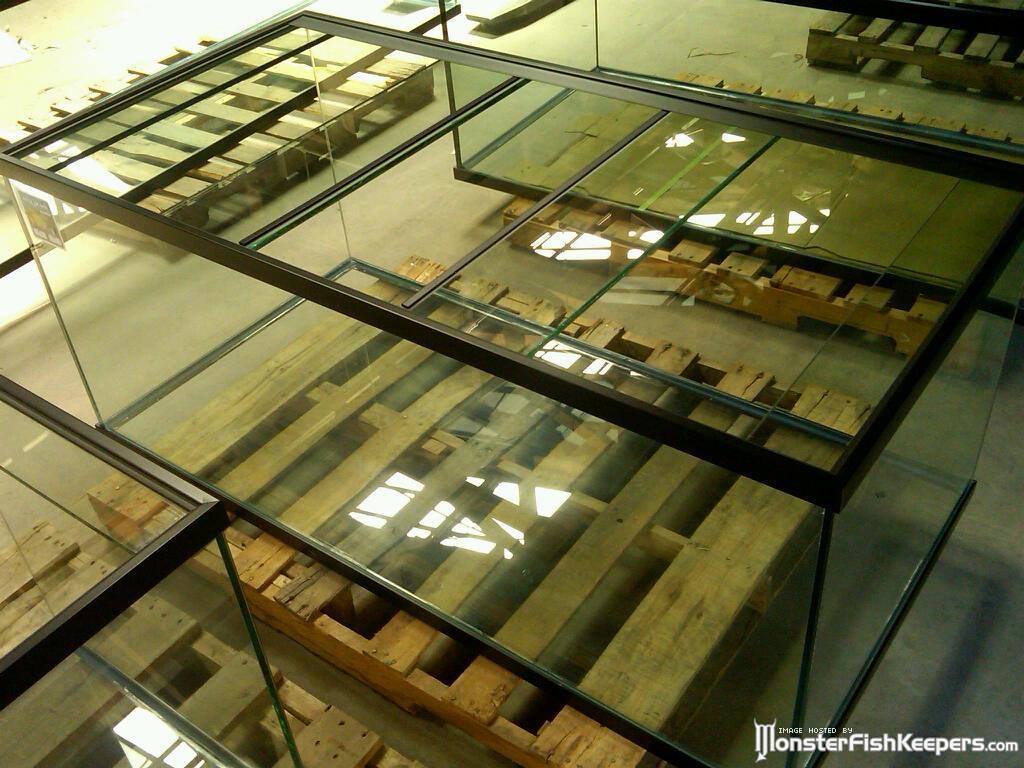
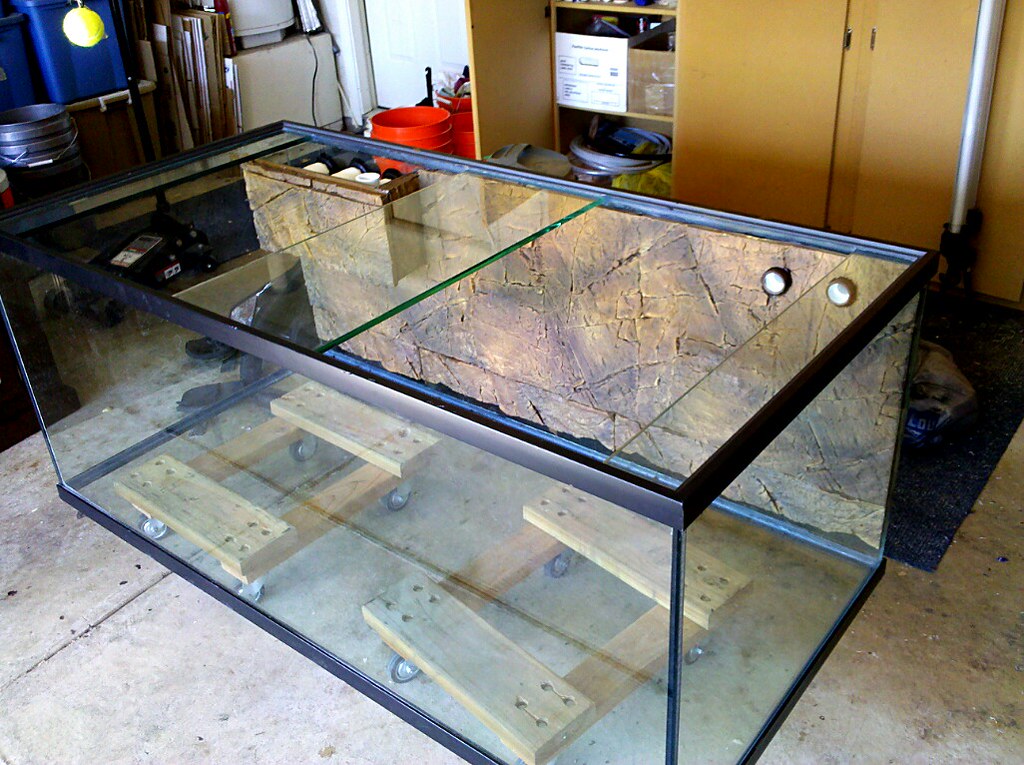
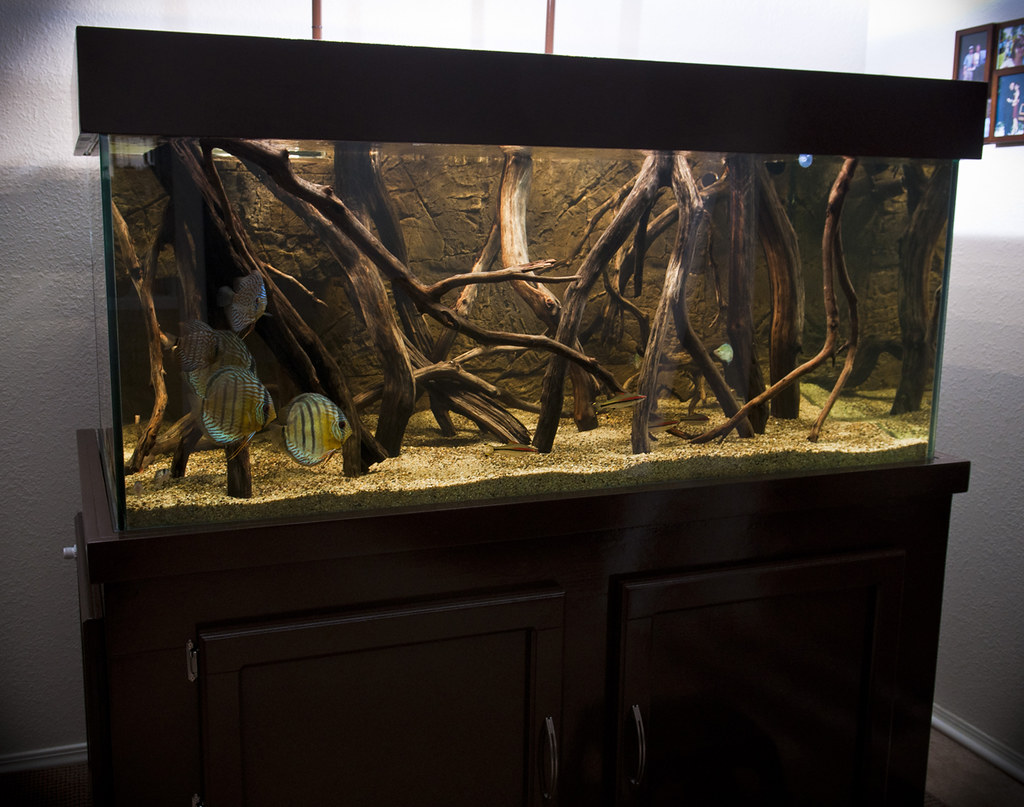
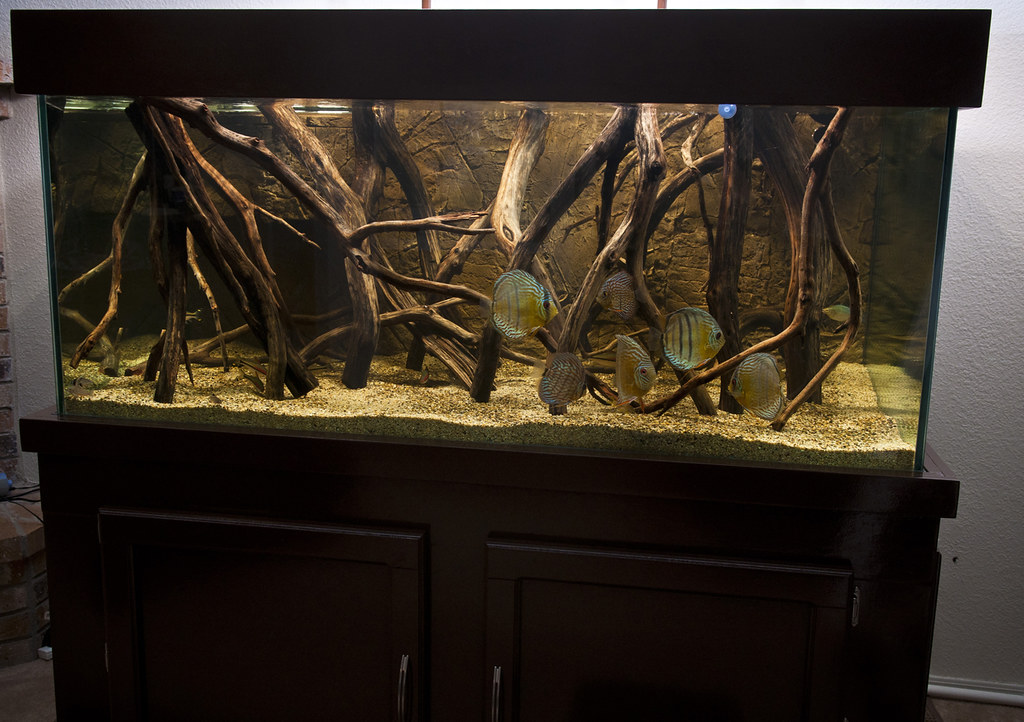
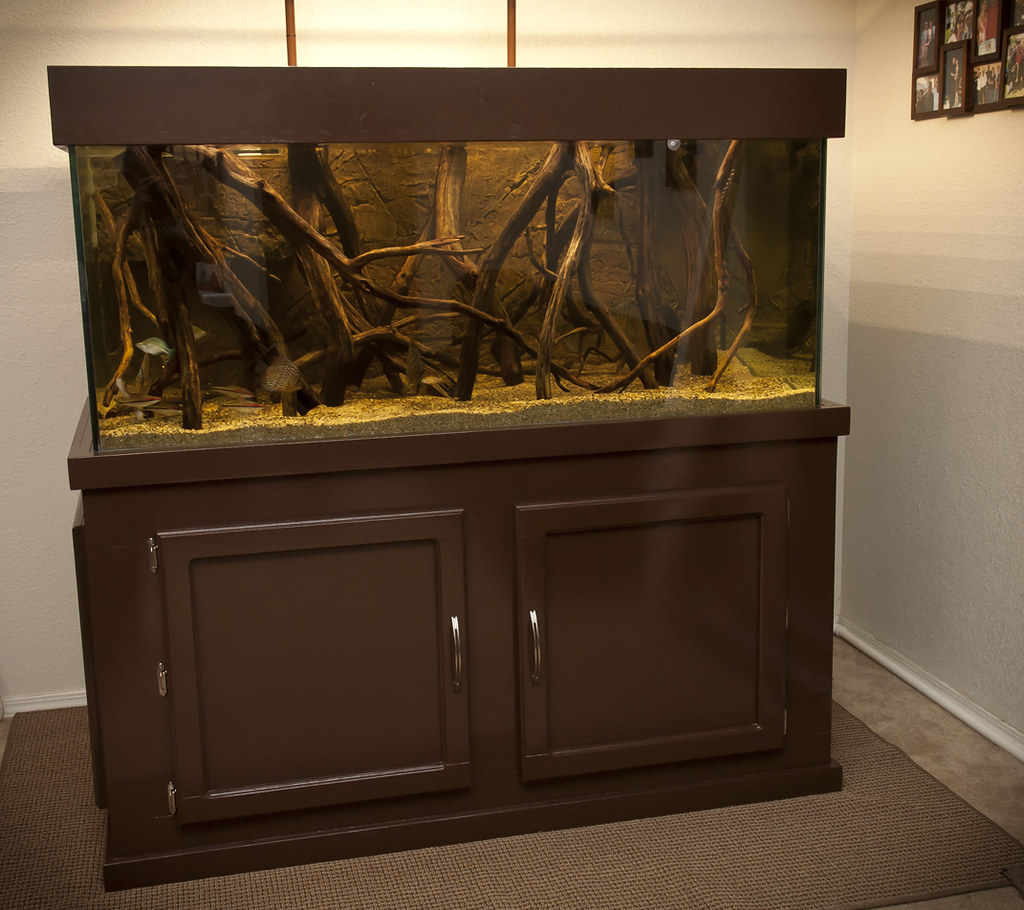
The tank measures 60x30x24, is made from ½ glass all around and holds roughly 190 gallons of water. I bought the tank used from Charlie @ The Fish Tank Factory in SoCal. The previous owner cracked the bottom pane, which was repaired by Charlies builder. The customer never came back for the tank, so I ended up getting a really good deal on it. It just involved a very long drive to pick it up!
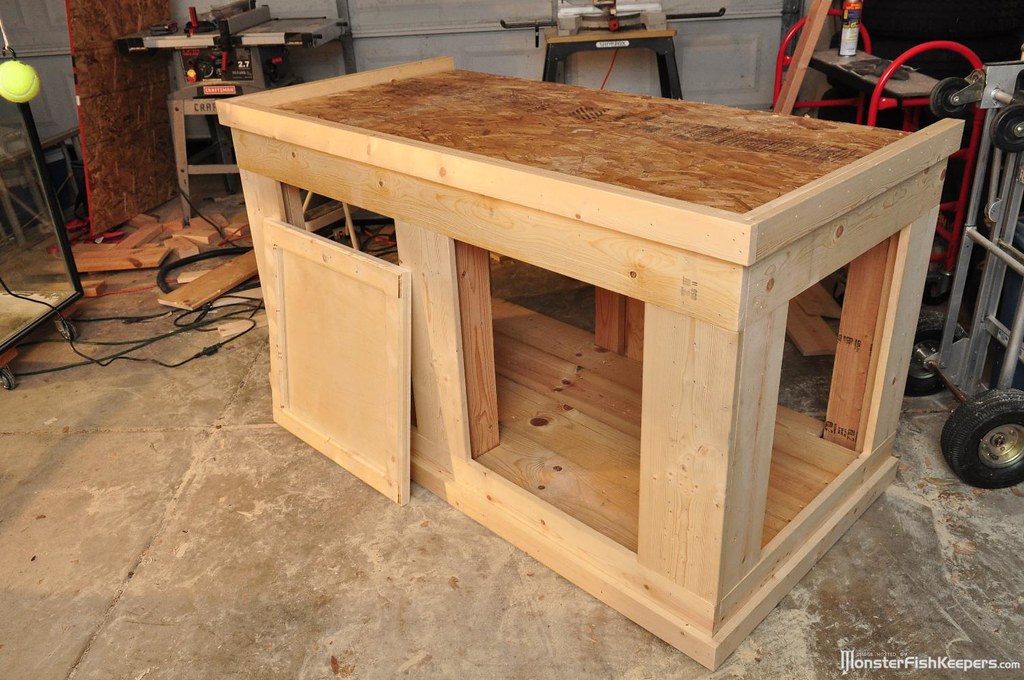
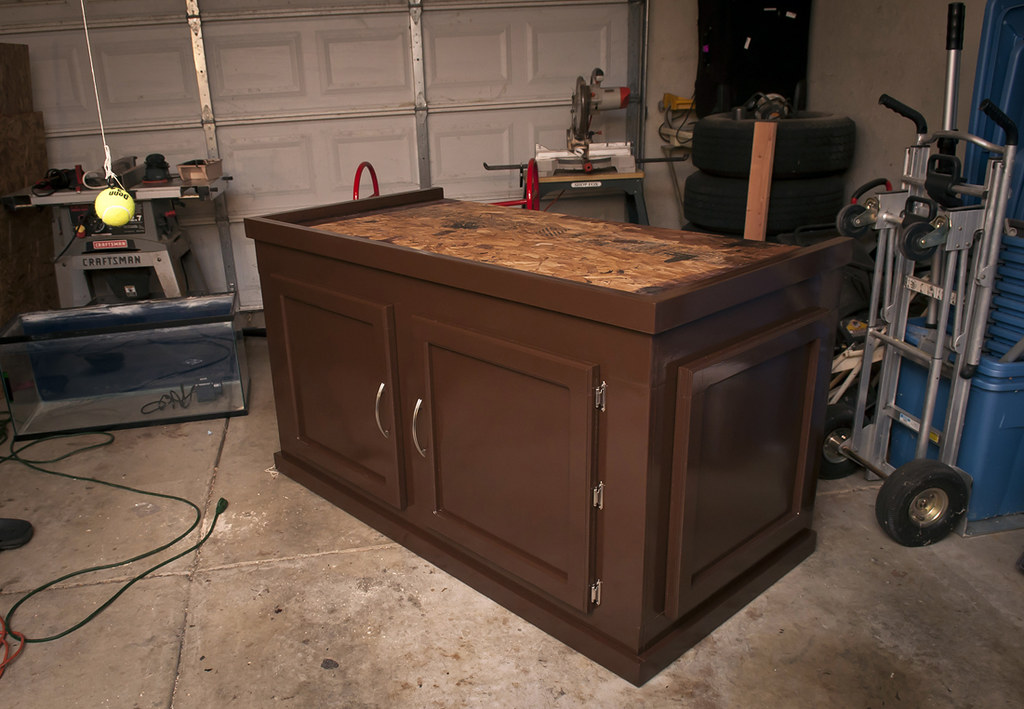
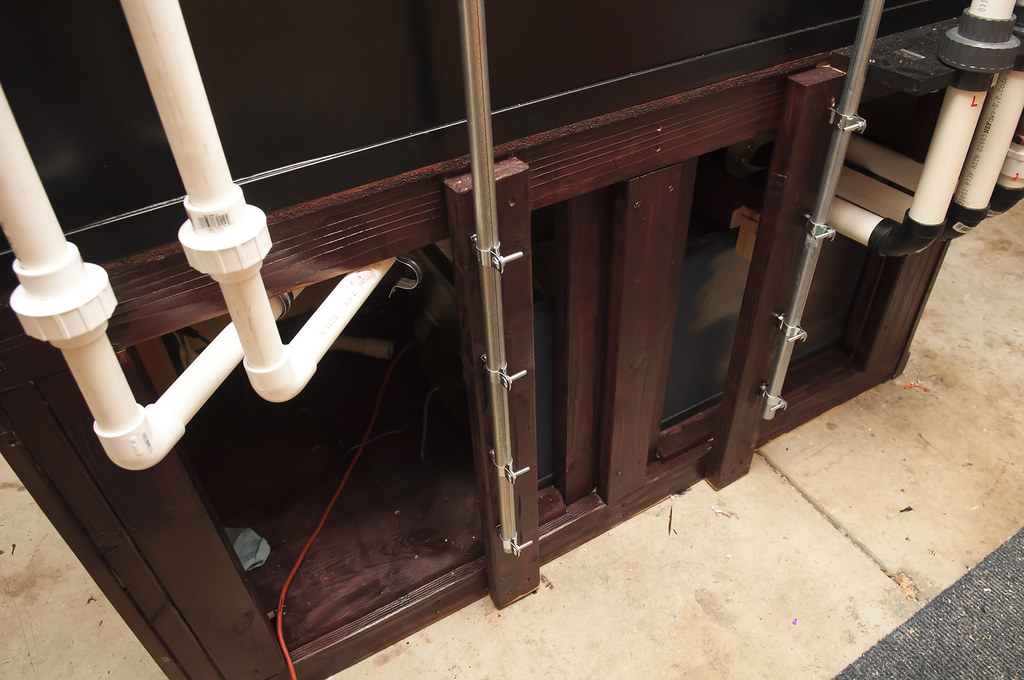
The stand is DIY, about 33 tall. This is the second stand I've built. I hate working with wood, I don't enjoy it all and only do it out of necessity. The stand is extremely overbuilt, but it's the easiest way I've found to build a stand. Its framed out of regular 2x4s, then skinned in whiteboard since it's light and cheap. Because I'm only painting it, I didn't need to go with some high quality wood.
The stand has side access doors along with the two front doors. The doors were built out of birch plywood panels, with a simple trim. It's not perfect, but came out decent, and I'm learning! Maybe one day I can build a stain-worthy stand. But for now, I think this will look just fine in my living room. Final color was gloss leather brown.
I also made an open top canopy out of whiteboard. Its just a simple box frame as I only needed something to hide the black plastic trim and finish up the top.


PLUMBING/FILTRATION
This is one area where I spent a lot of time, especially doing research. This was a bare tank with no overflow boxes and no holes, so I was starting with a blank canvas. Ive ran the Herbie setup before and I loved it. My main requirement was that this tank be dead silent as it was going in my living room. The filtration also had to be clean and simple. Im not a fan of messy wet/dry filters. Those that have seen my sumps before know what Im talking about 
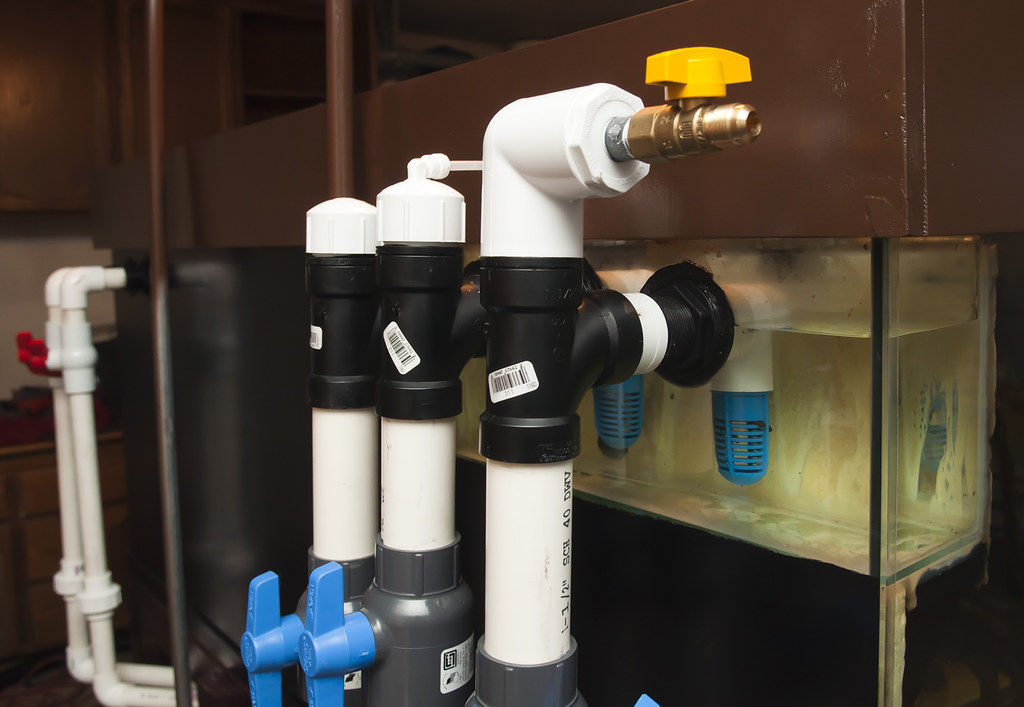
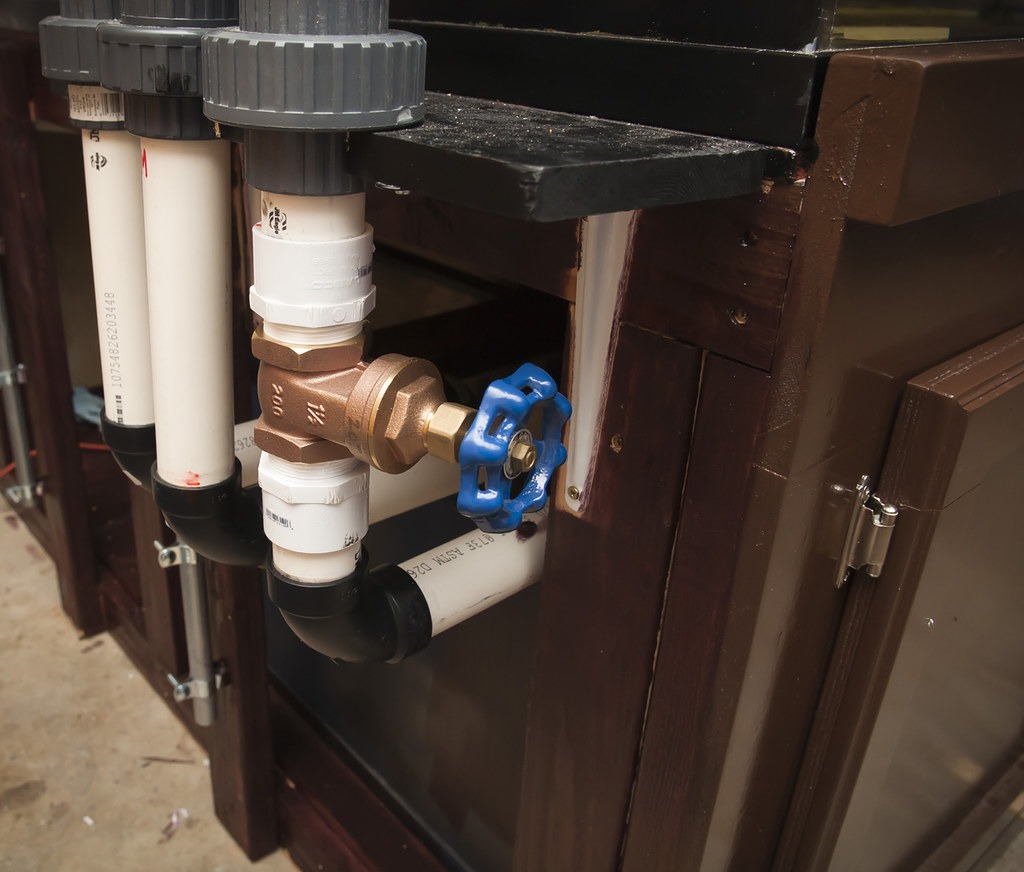
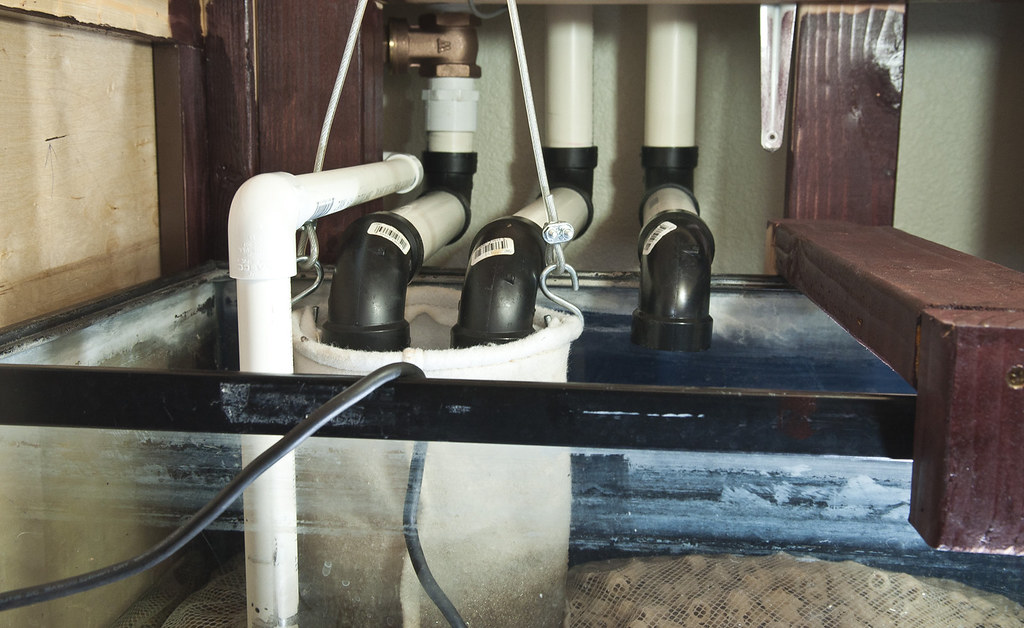
After doing lots of research on reefcentral.com, I decided to go with the Beananimal overflow system. It involved a little more work since it uses 3 drain lines, but after running both the Herbie and the Beananimal, Im convinced the Beananimal is better, safer, and quieter. Its quieter because it uses two downward facing elbows, unlike the Herbie which uses two vertical open standpipes. The downward facing elbows make it so the system runs silent with no air bubbles in the lines at all. But because the elbows are facing down, you get air trapped inside at start-up. This is where the 3rd line comes in. When you start up the pump, the water level quickly rises past the two drain lines and starts flowing down the emergency drain. After a few minutes, the system purges the air out of the two main lines and the water level drops down, resuming its normal operation.
So with a plan in mind, I set out to drill the holes. I have never drilled glass before, so this was a learning experience. I bought a cheap diamond glass bit on eBay and practiced on a spare 20g tank. It was really easy actually. Theres plenty of videos on YouTube that show the steps involved. I ended up drilling five 1.75 holes for 1 bulkheads.
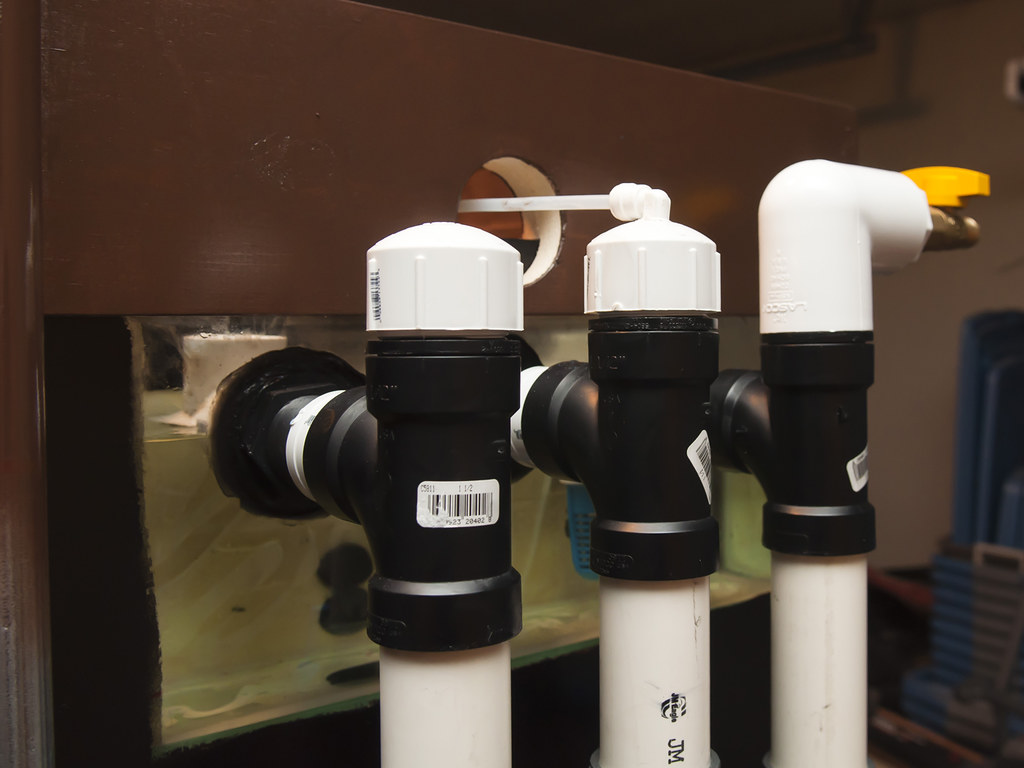
The Beananimal is built out of 1.5 piping. In fact, the entire system is built exactly like Beananimal original design as seen here: http://www.beananimal.com/projects/s...ow-system.aspx. The bulkheads are 1" with 1.25 elbows and strainers in the overflow box. Overflow box is DIY as well, using three pieces of ¼ glass.
The main drain is the one at the far right. The drain runs submerged and handles the bulk of the flow. Because its submerged, it runs as a full siphon, which can handle a lot more flow than a line that has air trapped in it. To restrict the flow and to control the noise, Im using a 1.5 brass gate valve. I was using the ball valve at first, but its much easier to fine tune the flow with a gate valve. Youll also notice that I have a small valve up top. For some reason, the air bubbled that traps inside this line during startup would not purge. I think it may be that my drain lines are submerged too far past the water level in the sump. I havent researched this yet, so I just added a small valve up top where I could release the trapped air. Without this, I was having water go down my emergency line indefinitely. As soon as I purge out the air, it goes back to normal.
The middle line is the open channel standpipe. This one basically operates like a Durso pipe, with a vented hole up top. The vent hole has tubing that extends below the rim of the tank. In the event of an emergency and a rising water level, the open channel standpipe will convert to a full siphon like the one on the right as soon as the vent tube becomes submerged under water. When it turns into a full siphon, it can handle a lot more flow than it could as a Durso, and can aid in quickly moving water down to the sump. Under normal operation, this pipe is flowing a small amount of spillover; whatever the main drain cant handle. Because its a small amount of water, the water clings to the inside walls of the pipe, thereby not making any noise. If it begins to flow too much, then air gets trapped with the water, and you get the classic gurgling sound that overflows are known for!
The last pipe on the left is the emergency drain, and simply consists of an upturned elbow. As I mentioned above, this pipe sees water each the pump restarts, until the system purges the air out.
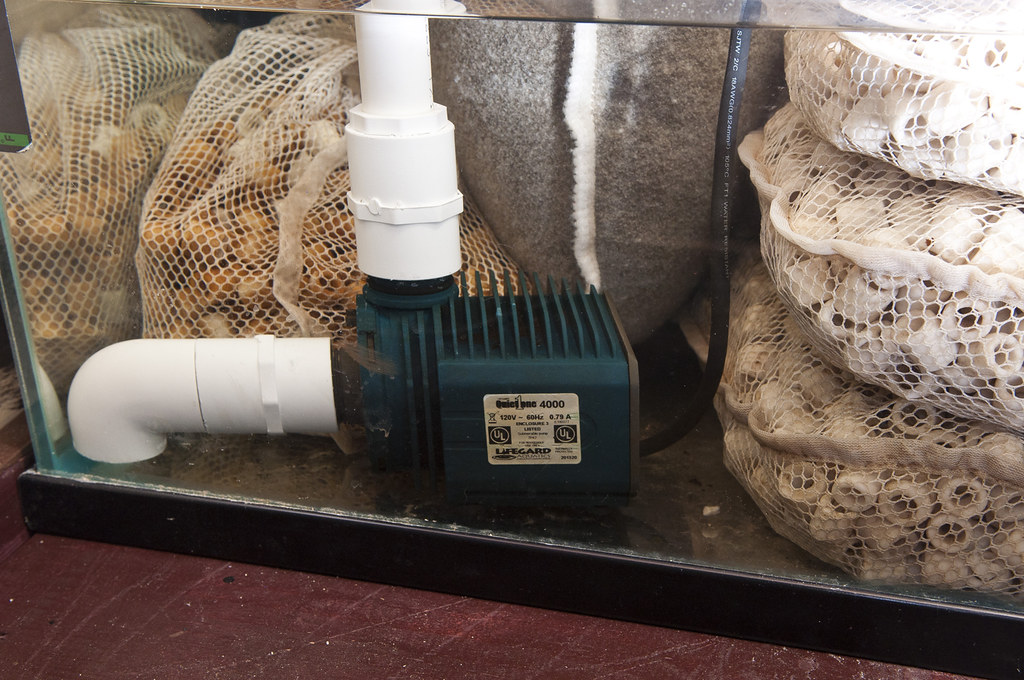
The main drain and open channel drain both flow into one filter sock in the sump. Im currently using a 25 micron 7x16 filter sock.
The sump itself is made from an old 40g glass tank. This is quite possibly the cheapest, easiest, and most efficient sump you can build! You dont need any drip trays, dividers, or baffles. All thanks to the media of choice. I have about 30-40lbs of porous ceramic media, which works much better than bio balls or pot scrubbers. Because this media is used fully submerged, it makes the sump very easy to build.
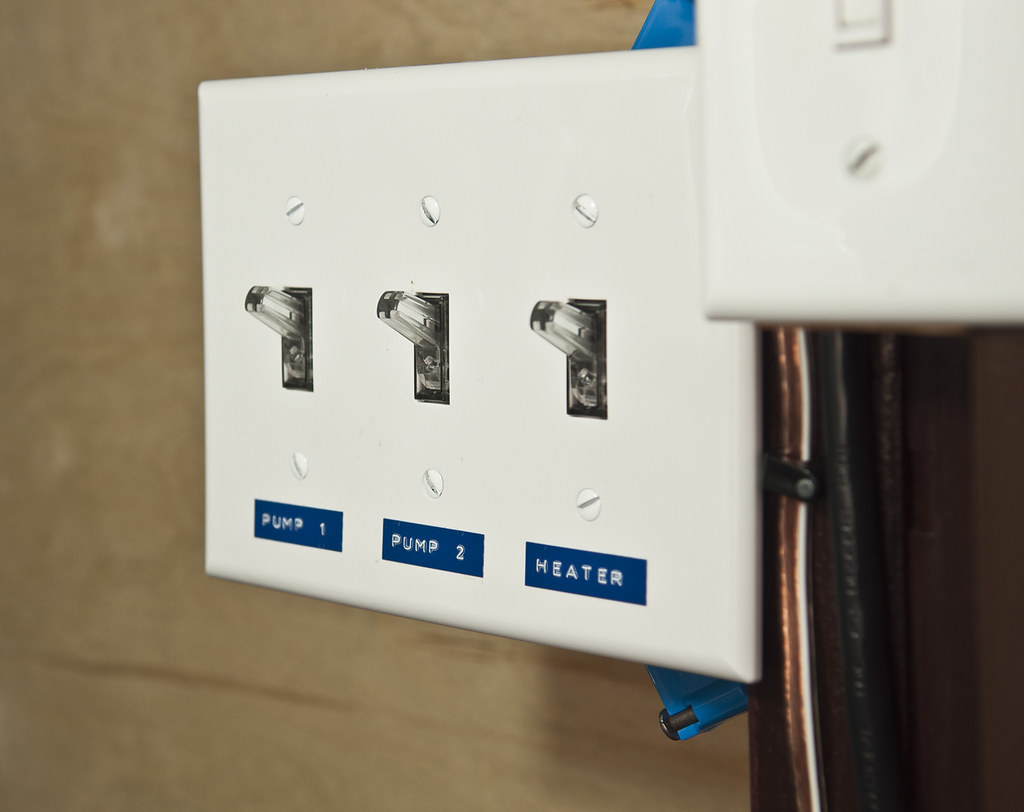
Im using two return pumps for this setup: Quiet One 4000 (1017gph) and 4000 HH (980gph). These return back to the tank via two 1 return lines. I have a ball valve on each to be able to reduce the flow as needed; wild discus are particularly picky about not having strong currents in the tank. The returns on the inside consist of 45* elbows that I can rotate to adjust the surface current, or aim down if I wish. The return lines also have 1.5 swing-type check valves to stop the flow back to the sump, since they are several inches below the water surface.
Heating consists of a Rancho ECT1-R temperature controller and a 1000w titanium rod. I hate using regular aquarium heaters. They are so inaccurate and unreliable. This setup truly is set it and forget it!


LIGHTING
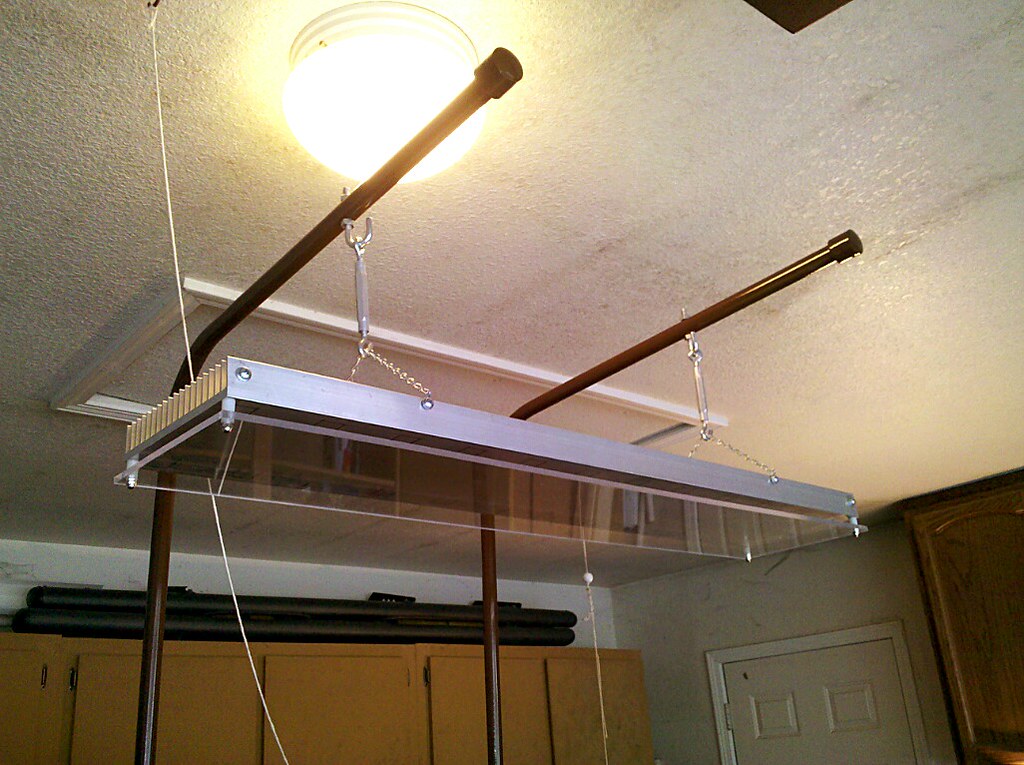
Lighting is one that deserves its very own section, since I went into total crackhead mode here  I did a lot of think and a lot of research before finally pulling the trigger. I know for certain that I did not want to run fluorescent lighting. I was tired of the flat look it gives the tank. Its very unnatural, and I dont like how every square inch of the tank is lit up evenly. I also knew I wanted the shimmer effect, so it was either metal halides or LED. Metal halides were completely out of the question, since I dont like the idea of making the electric company rich! So, LEDs it was! I was almost set on running 4-6x 10w LED floodlamps you see more and more folks using these days. In the end, I decided to go DIY to give me more flexibility. These floodlamps are made in China, so you cant really know how long theyll last, or whether youll be able to buy replacements in the future. But the main reason for going DIY was color choice. Cool white LEDs are ugly in my opinion. They wash out the color of fish too much. The warm whites are very yellow. If I chose the floodlamps, I wouldnt be able to mix up the colors to get a nice mixture.
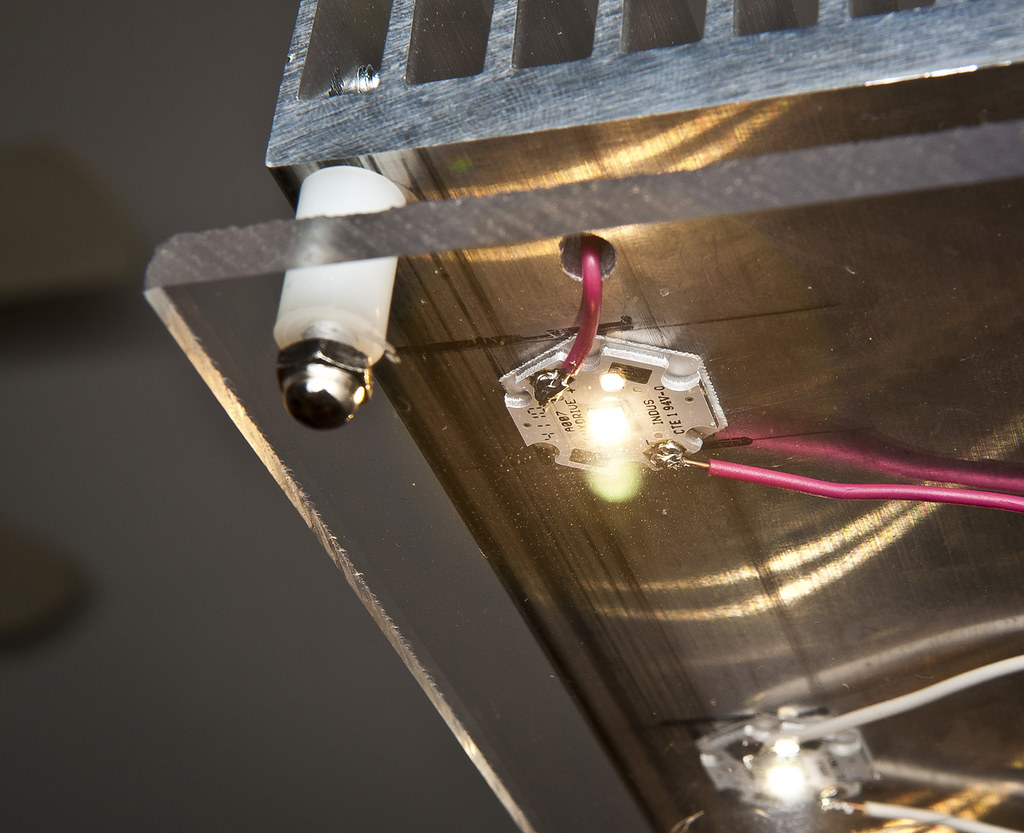
The light bar itself I made out of 1 metal conduit, which I bent into shape using a manual pipe bender. The light fixture is a big and heavy piece of aluminum heatsink, measuring 7x36. I also attached a splash shield made from ¼ acrylic. The shield really isnt needed, but it finishes off the fixture nicely, makes it look more legit.
The LEDs are Cree XP-Gs. They cost a little more than other brands, but the quality and reputation is well worth the extra cost. The fixture uses 12 neutral white LEDs (4000k) and 12 warm white LEDs (3000k). They are arranged in two rows of 12, alternating each color in the two rows. LEDs were soldered up using 20ga solid core wire, wired in series and in 4 strings of 6 LEDs each. More on this below.
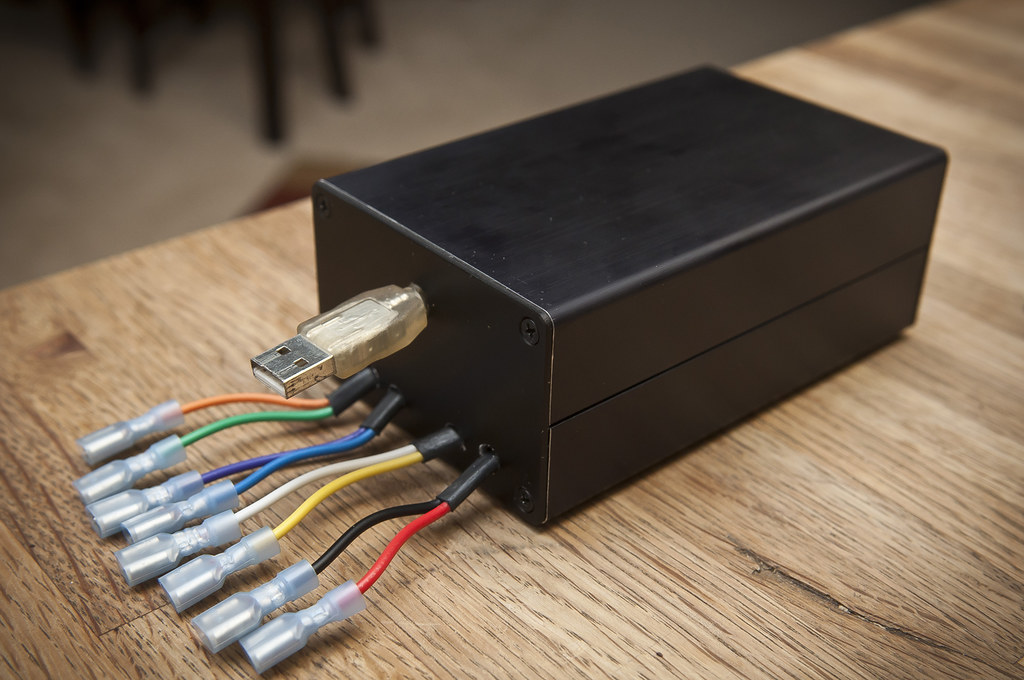
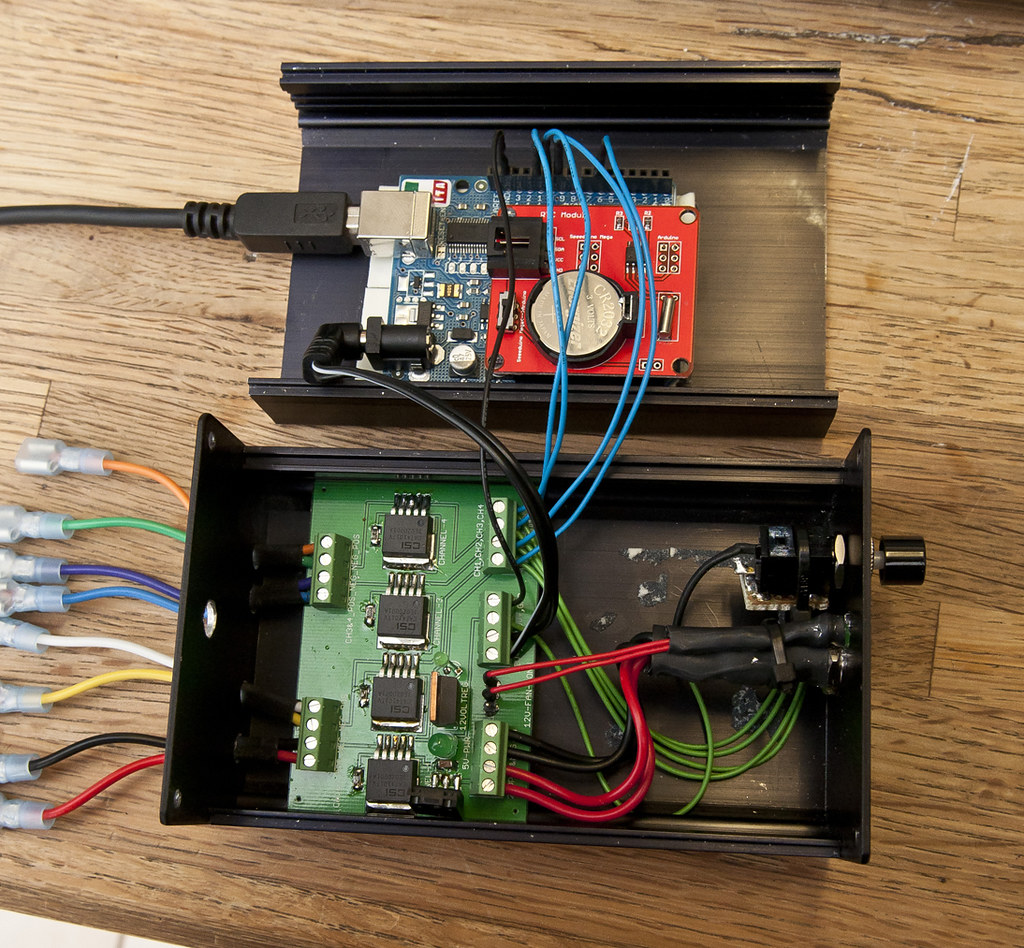
The brains behind the operation is what really makes this light special! My initial plan was to drive the LEDs using pre-wired Buckpucks with a dimmer switch. But after talking to my good buddy Aaron (member: o2surplus on monsterfishkeepers), he convinced me to go with a custom driver and a microcontroller. The driver was built entirely by Aaron, so I take no credit here. In fact, if it werent for him constantly answering my noob questions, I probably wouldnt have been able to go the DIY route. If youre interested in a driver setup like mine, shoot him a pm, he may be able to build one for you
The LEDs are driven by four ON Semiconductor CAT4101 constant-current drivers. Each CAT4101 is controlling a string of 6 LEDs. 4 drivers running 6 LEDs, total of 24 of LEDs. Each driver controls an individual color; drivers 1 and 3 control the warm whites, drivers 2 and 4 control the neutral whites. The current to the LEDs is controlled by soldering an external resistor to one of the CAT4101s pins. In this case, a 549ohm resistor was used for each CAT4101 to drive the LEDs at 1000mA, or 1a. The XP-Gs can handle up to 1500mA, so this is well within their safe operating range. For those who want to understand more on the CAT4101, you can find the technical specs here: http://www.onsemi.com/pub_link/Collateral/CAT4101-D.PDF
For dimming and on/off control, the CAT4101 relies on an external pulse width modulation signal (PWM). That is where the Arduino Duemilanove microcontroller comes in. To keep the microcontroller in sync with the on/off cycles, and in case the power is disconnected, the Arduino is connected to a DS1307 Real Time Clock with battery backup. The code I uploaded to the Arduino is set up to run sunrise-to-sunset lighting. The lights slowly fade on in the morning, and slowly fade out at night. Each LED string is fully adjustable for start time, photoperiod length, and brightness. This allows me to dim or brighten up the warm and neutral whites to get the color mixture I like. All I need to do is hook up the Arduino to my laptop and quickly edit the code. How freaking cool is that?!?!?
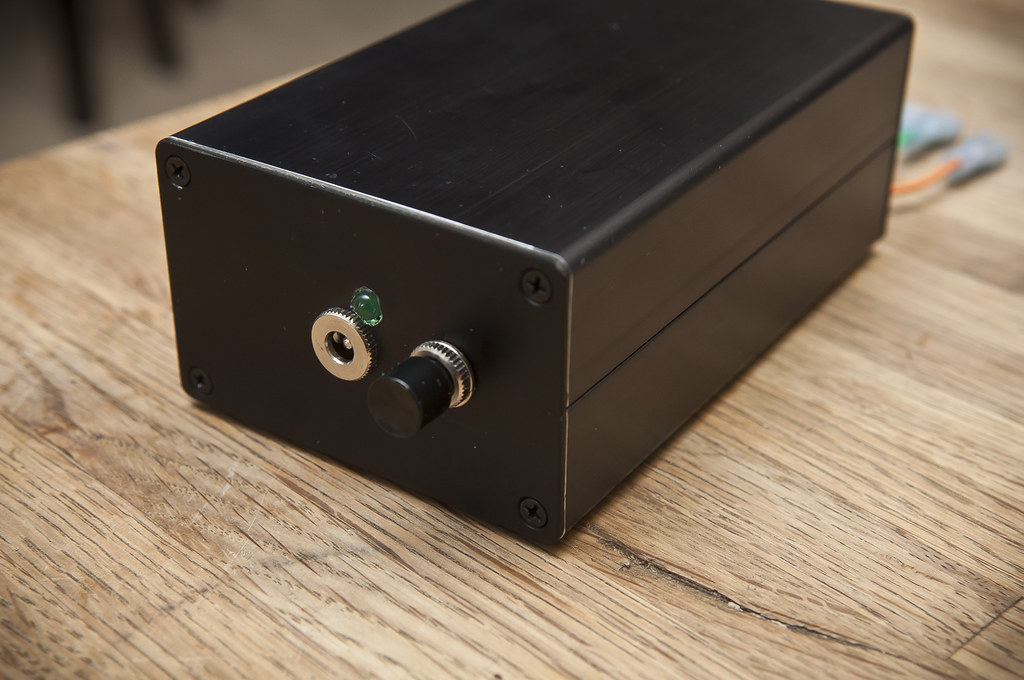
This magic black box that Aaron built me is really a work of art. The board is so neat and tidy. All the terminals and connections on the board are labeled. Everything is taken care of; the 24v power source hookup, the 5v power to run the CAT4101s, 12v power for the Arduino and fan connections, and the pins for the 5v PWM signal to the Arduino. He even included a power indicator light and an override switch to turn the LEDs on at any time, bypassing the Arduino. Only thing I needed to do was purchase the microcontroller and Real Time Clock and hook those up. So easy, a caveman can do it!
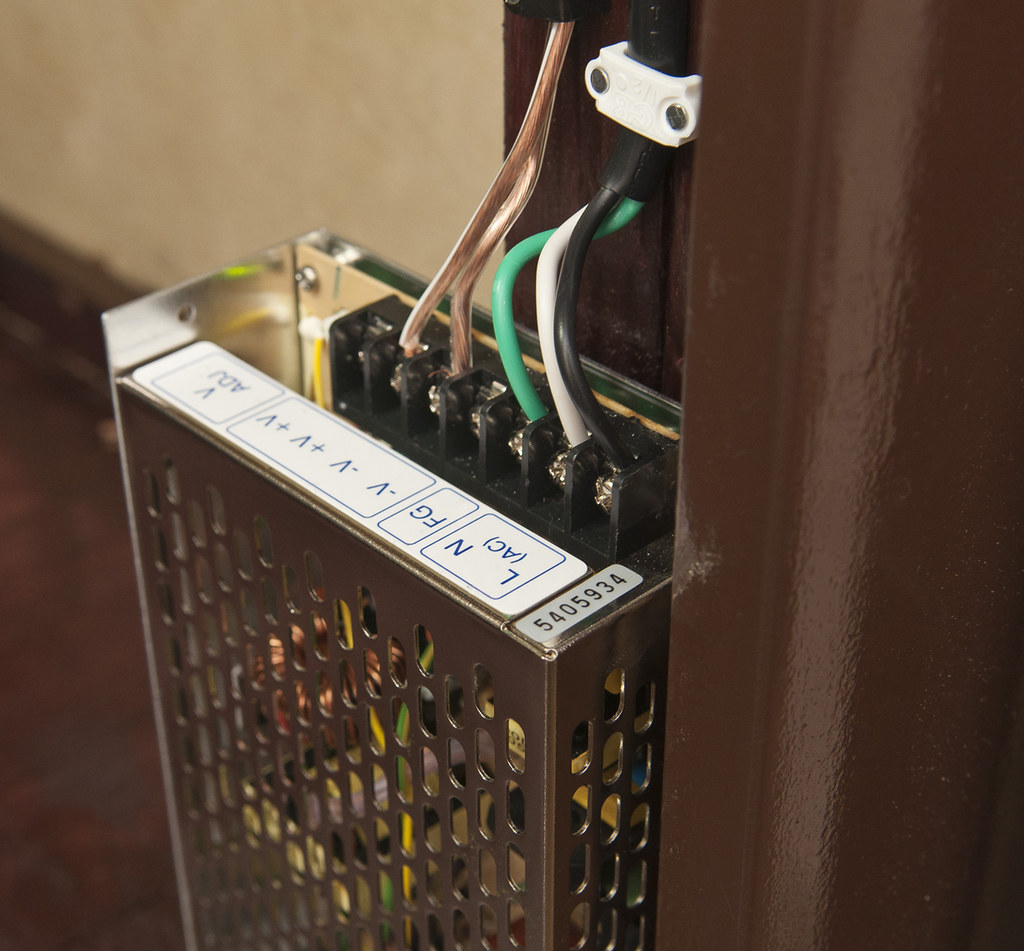
And last but not least, the power supply. Everything is powered by a 24v, 6.5a, 150w power supply.
The project box, showing USB connection for microcontroller and LED hooksups
Other side of project box: 24v power hookup, LED indicator light and override switch
Custom PCB: screw terminals on top row are connections for the 4 LED channels. Middle row you'll see the four CAT4101 drivers. Bottom left terminal is 24v power supply connections. Bottom middle terminal is 12v power supply for microcontroller and ground connections. Bottom right terminal is for the PWM signals from microcontroller, and for manual override.

This shows the 24v power hookup and override switch

The Arduino Duemilanove microcontroller (on inside lid of project box)

The Arduino with the Real Time Clock module attached

Driver PCB and Arduino connected
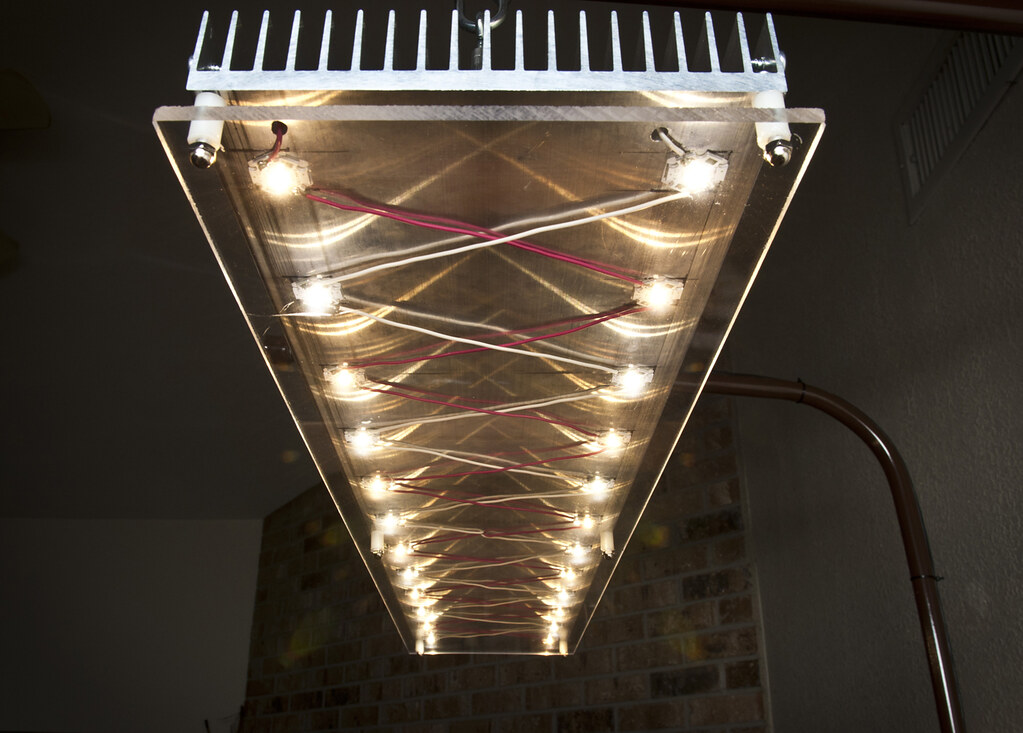
Warm white Cree XP-G
This is a good photo showing the true-life colors of the neutral whites and warm whites

24v 6.5a power supply
DECOR
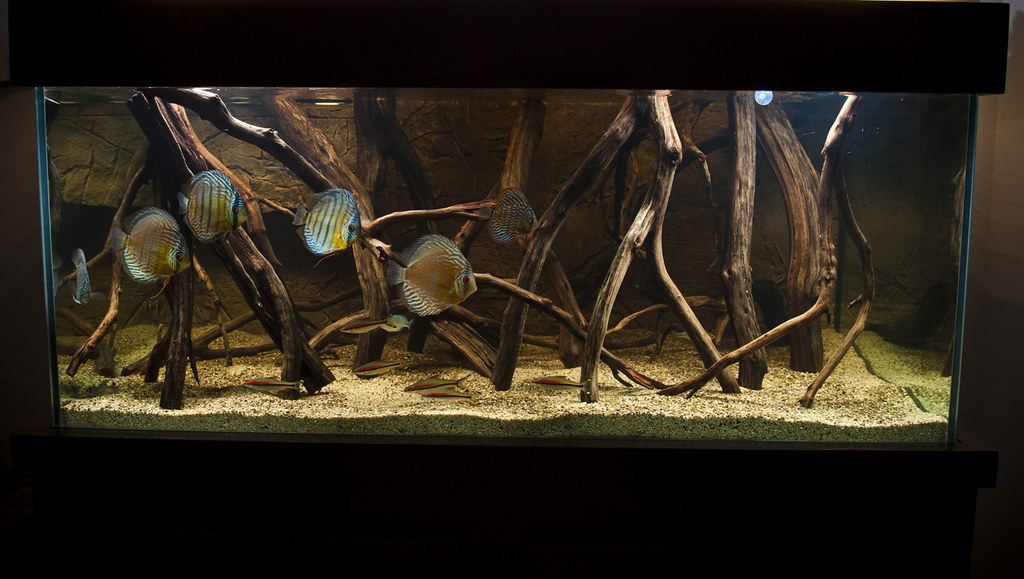
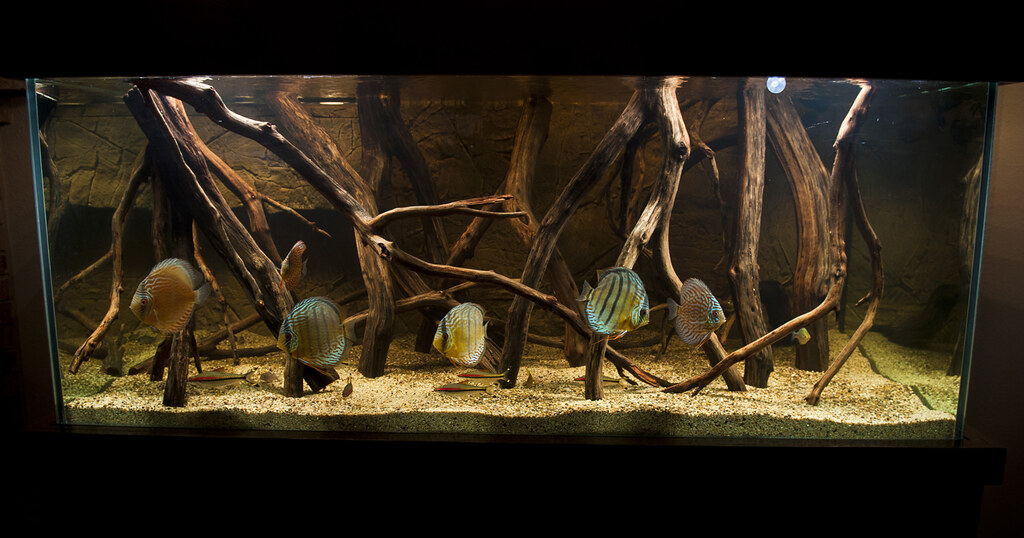
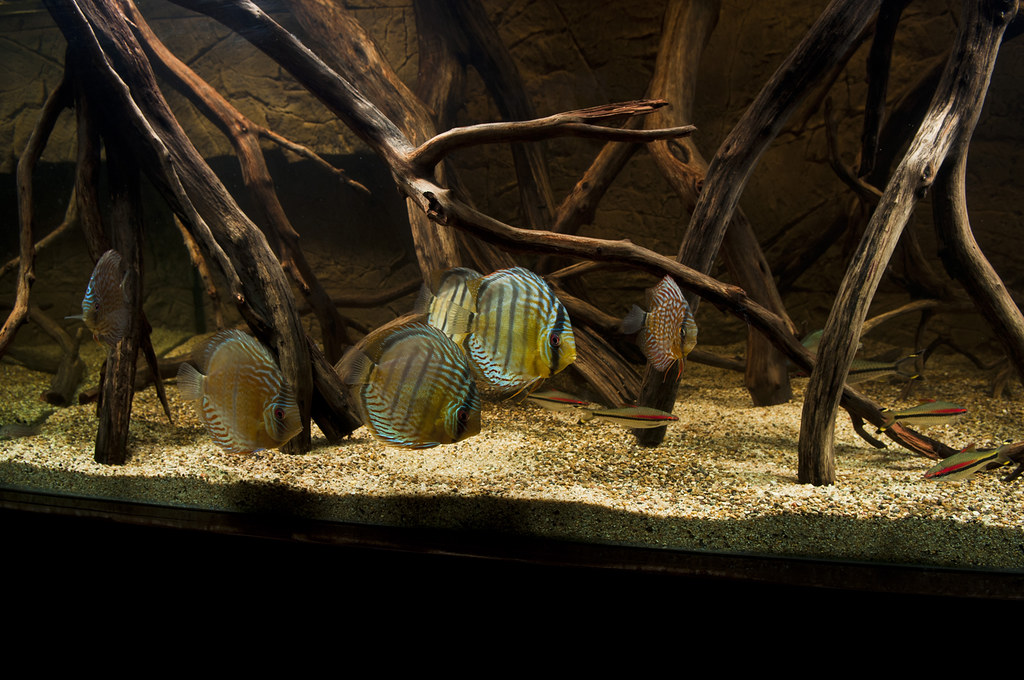
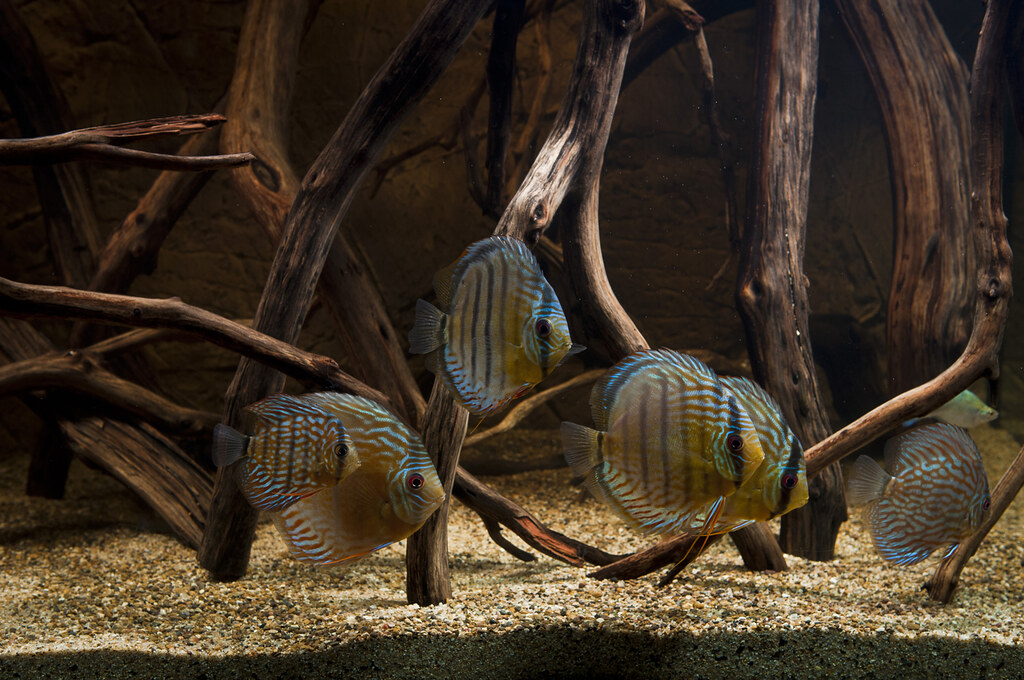
Decor for this tank is pretty simple, since I was going for a South American biotope look. I wanted a nice 3D background, but I didnt want to lose several inches in depth. So I settled for the thin pieces that are tiled on. I ended up going with the Aqua Terra Slimline Mesa Rock background. Those you know backgrounds, know that Aqua Terra is really the best there is. When you see one in person, youll know why. To finish up the look, I also covered the overflow box with the background tiles.
The substrate is a mixture of sand and gravel. Sand is 12# mesh Monterey Beach Sand. The gravel mixed in with the sand is Klondike Brown gravel. Both the sand and gravel were purchased from a local rock yard.
Driftwood is Manzanita, collected locally in the northern California area. I placed the driftwood vertically in the tank to give it the look of tree roots growing into the water.
WATER CHANGER
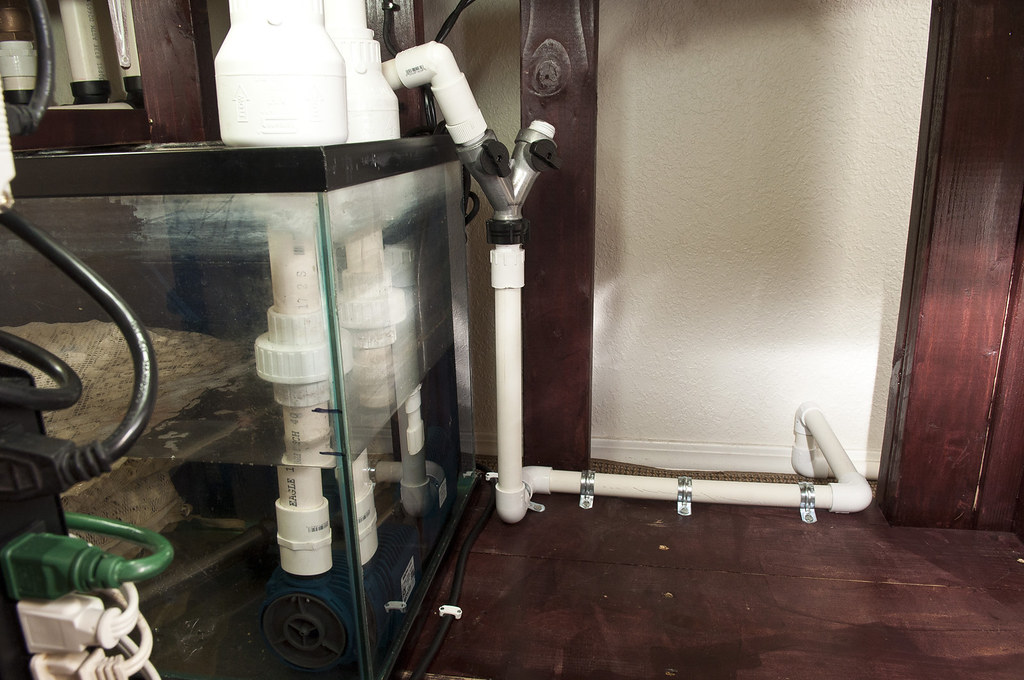
To make my life easier with the constant water changes needed, I decided to set up as semi-automatic water changing system. Since the tank was in my living room, it was a little difficult to set up a 24/7 drip system, because I couldnt take advantage of gravity to drain the excess water from the sump. To do so would have required a system with float switches, reservoirs, solenoids, etc. I didnt want to deal with the extra cost, so I chose a super simple setup.
The main part of the system is the 55g aging barrel. The water is fed from my washers cold water supply line. It passes through a chlorine/chloramine filter, pressure regulator and then goes to the aging barrel. The water level in the barrel is maintained automatically with a float valve. I chose to use a barrel to heat and age the water for degassing purposes.
The 55g barrel is in a coat closet, and contains a small submersible pump to supply fresh water to the tank. There is another submersible pump in my sump; this is used to drain the tank for the daily water changes. The drain and refill pumps are controlled by a wireless remote control (this one to be exact). To actually perform a water change, this is what I do:- Turn off main pumps and heater, let extra water flow down to sump.
- Turn on the drain pump in my sump via the remote control. This drains to a nearby bar sink.
- Once the sump is empty, turn on the refill pump via the remote control. This supplies aged/heated water from the 55g barrel.
- Once the sump is full, turn on the system.
And thats it! After that, the 55g barrel gets refilled with treated water from the float valve, ready for the next days water change. With this setup, I can change 30-35g per day, depending on how much water I keep in the sump. And I can do it in a matter of minutes while sitting on the couch, thanks to the wireless remote!
Cold water feed from washer hookup. Feeds to aging barrel (not shown)

Drain pump that drains to nearby sink
Drain pump
Spigot that refills the sump from the aging barrel, with a Y-valve for adding water to other tanks
In a few months I plan on going to a fully-automatic system, whereby the drain pump comes on at set intervals throughout the day using a timer, draining only a few gallons at a time. The sump will then be refilled using an automatic top-off controller, commonly used in reef tanks. I spent too much on this tank already, so I saved some money by not buying the top-off controller right now. I will soon though
FULL TANK SHOTS!!!!!!!!!!!!!!
Well, that was a long write-up. I think that covers most of it. On to the full tank shots! I will update this thread regularly with new pictures. The tank is a bare fish-wise right now, but I plan on having 15-20 wild discus in the near future. Stay tuned! Any questions, feel free to ask. Enjoy!


 Reply With Quote


WOW! You've got me thinking about tinkering with my setup more, in the lighting area and that background. Really really considering a background like that now. Love that light fixture
I notice you don't use lenses for your LEDs, do you ever notice any real bright light spill in your eyes coming from the fixture when looking at the tank? Unless I have the lenses on I get blinded when approaching the tank in the gap between the splash shield and heatsink. Experience that with yours? I think I want to tweak my whole light system and add in some more of the cool whites, they really give that nice touch of blue to the striations on the fish. I might just remake the fixture LOL


 Posting Permissions


