Reply With Quote
Very cool Rick. The controller acts just as a simple relay for both lights and heater? No way to control dimming the light right?
 |
 |


Thanks for the ideas. Great step by step.

Very cool Rick. The controller acts just as a simple relay for both lights and heater? No way to control dimming the light right?
Your discus are talking to you....are you listening

The heater controller and the LED lighting are two separate entities, I am just going to house them in the same enclosure, so no, the controller only operates with the heater.Originally Posted by Second Hand Pat

If you wanted to add a dimmer to the LED light, you would need one of these:
http://www.ebay.com/itm/Black-Manual...item2eda14e968
Ex-President-North American Discus Association-NADA
[SIGPIC][/SIGPIC]
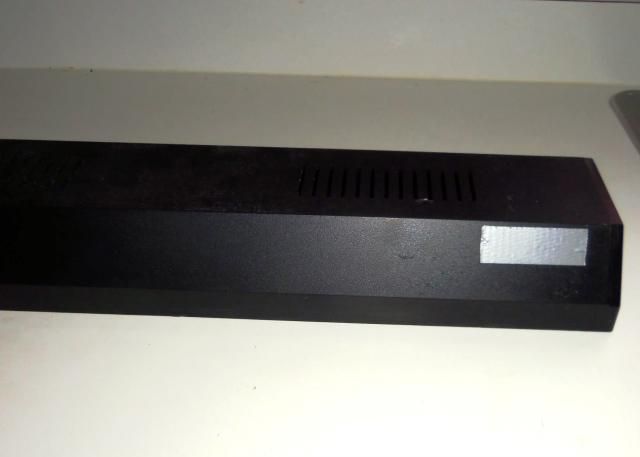
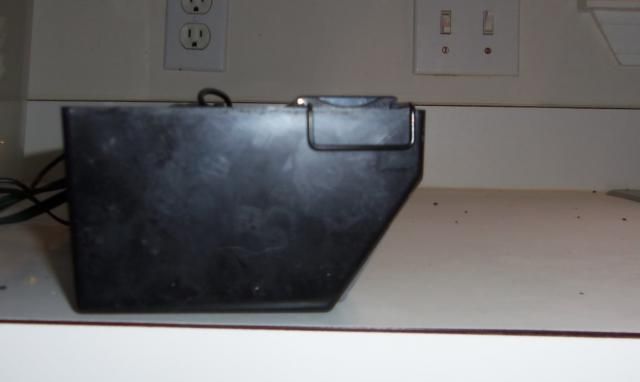
Mounting
Step one:
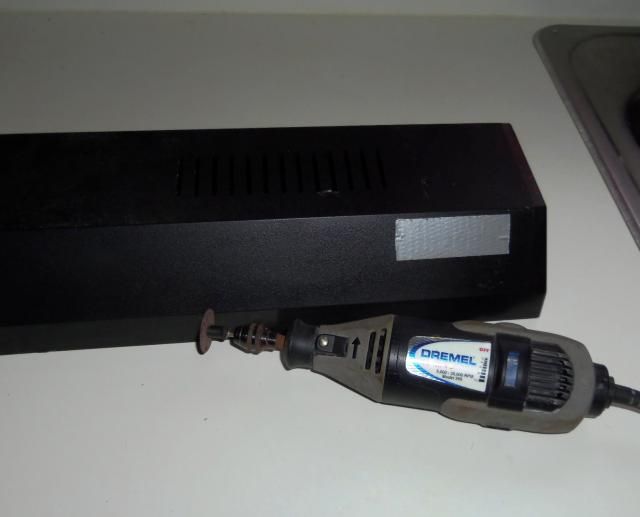
Take some tape (duct tape, painters tape, etc) and make your self a cutting template the size of the opening you want to cut. Make sure not to cut too big, you can always make a smaller cut bigger, doesn't work so well the other way
I have found the best way to cut out plastic is to use a dremel with a cut-off wheel. Others may find different methods better (or they just don't have a dremel)-(for shame, every self respecting DIY'er has a dremel).
Opening has been cut:
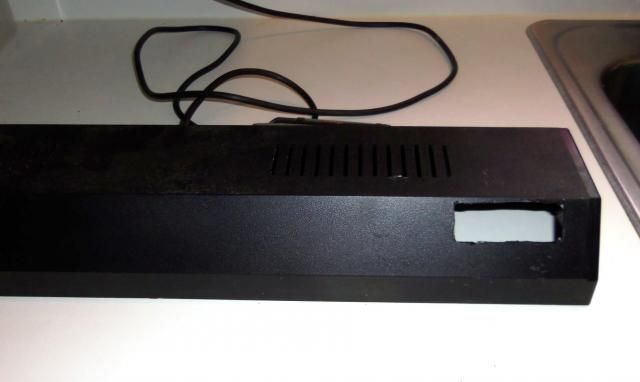
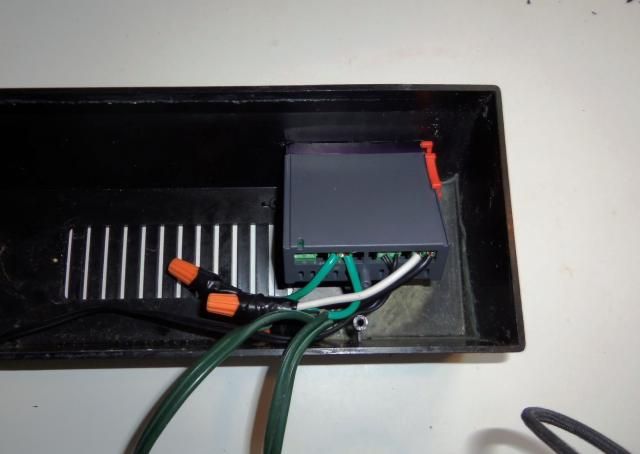
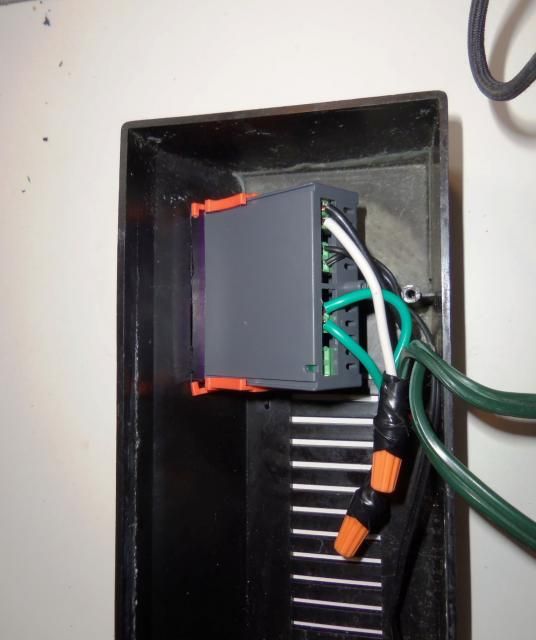
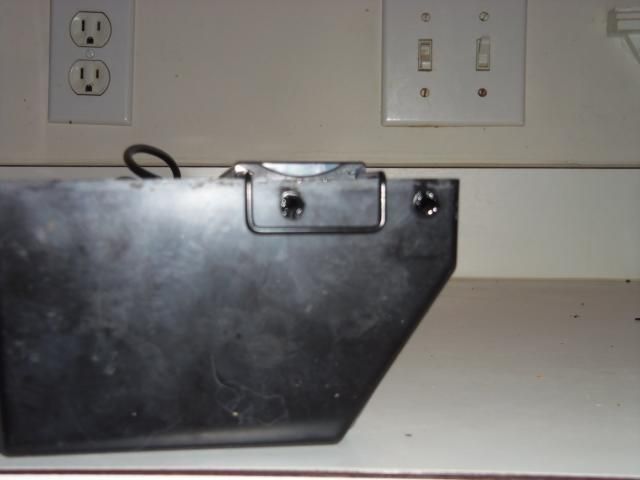
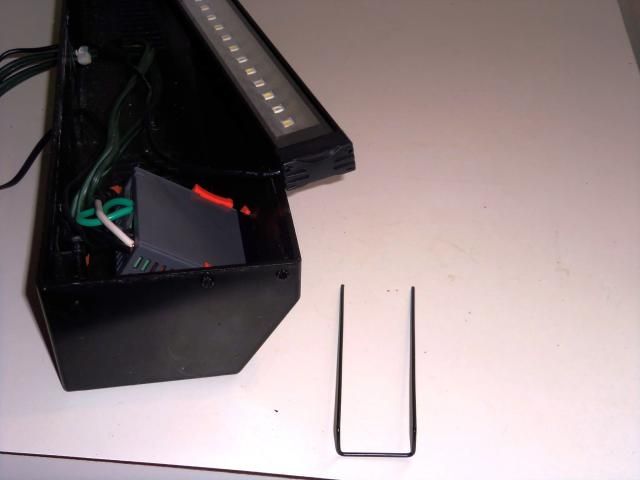
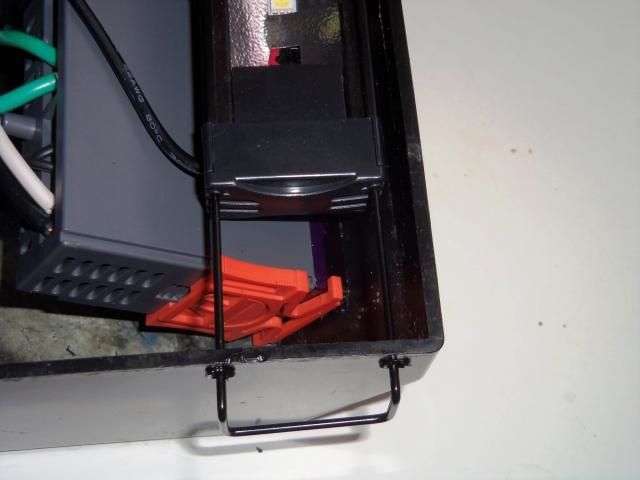
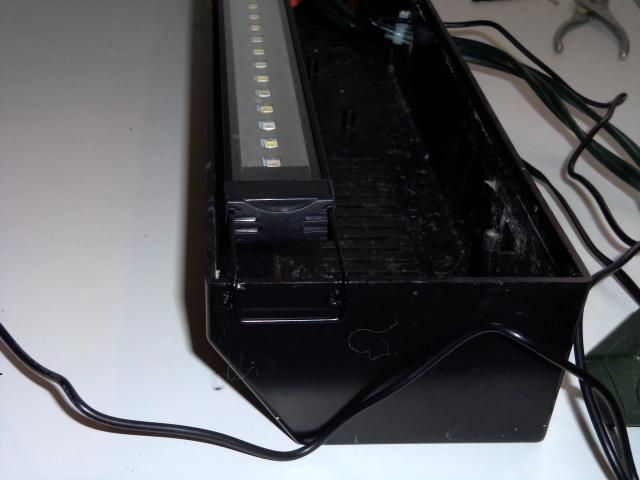
Remove the orange retention clips from the controller, these are used to sung up the controller to the enclosure. Feed the wires through the opening carefully and insert the controller into the hood:
Re-install the retention clips, slide them up to opening and make them snug:
Ok, now here I am going to cheat a bit-take a short cut. Notice I have removed the on/off switch from the light as well as the power cord and grommet leaving two openings. Now normally I would have fed the power cord and heater dongle through these holes, however I needed to document to the best of my ability the wiring of the controller. If you like you can carefully remove each at the wire nut, feed them through and re-attach or you can do what I did here. Cut a slit from the edge of the hood into the hole that previously had the on/off switch. Keep the hole narrow enough so that the cord can only be fed down the channel width wise, and then twisted to avoid it from falling out. Do the same with the female heater dongle (the part the heater plugs into) and the probe ( I actually ran the probe out the other hole, you can do either).
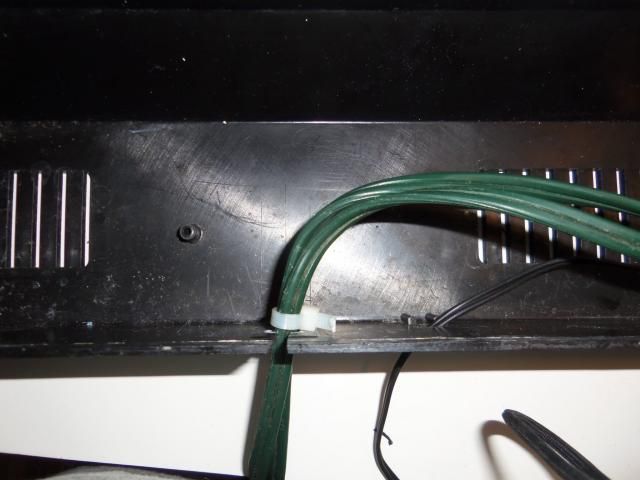
Take a zip strip (you can also use tape) and sip tie the two lines together. Make sure to leave some slack inside the enclosure to the controller. This will prevent you from accidentally catching the cord on something and dislodging it from the controller:
Installing the LED light
First I set the light into the enclosure and center it the way I want it.
Here you can see I have taken the wire clips at each end of the light and flipped them. To do this just pull them out of the LED fixture and reverse.
Drill two holes the exact same width apart and the two prongs on the lights retention clips. I actually lost the drill bit to my dremel so heated up a very small phillips screw driver and melted my way through. Make sure you place the holes far enough up so the light will not protrude out from the bottom of the hood.
Remove the retention clip from the LED light fixture:
Re-insert the retention clip back through the two holes you just made and back into the LED fixture:
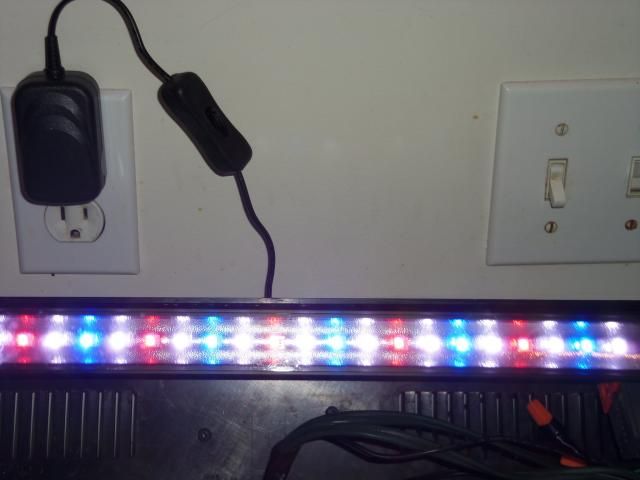
Repeat the process on the other side. Also run the power cord for the light through the slit we made for the power cord of the controller (I actually should have waited until now to put on the zip tie) and take some electrical tape and on the inside of the enclosure tape the led power cord to the controller power cord:
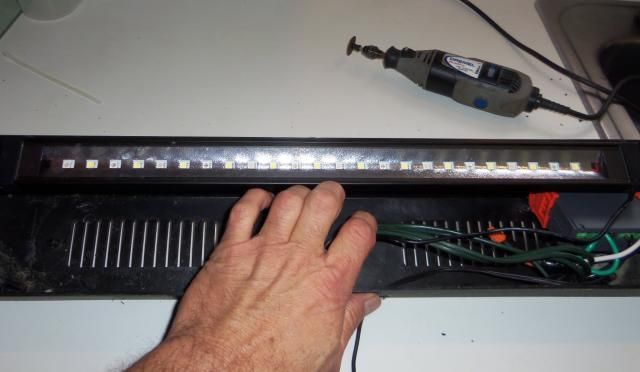
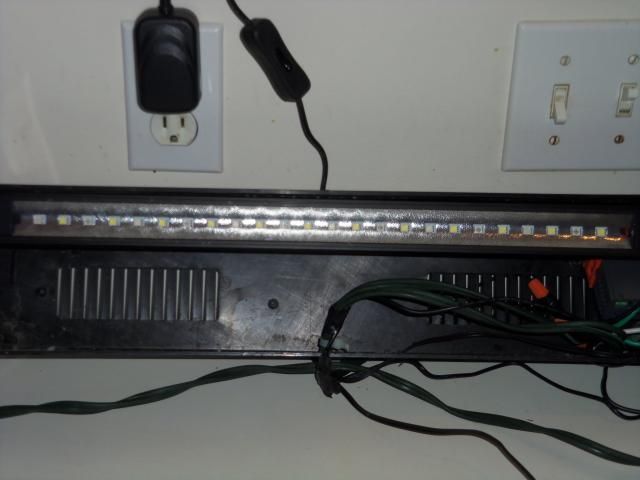
Plug the light in and test:
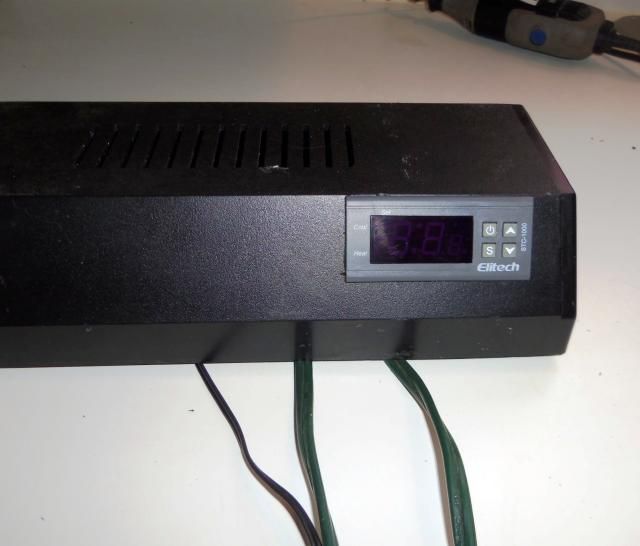
We can now test out the controller. To do this make sure the power switch to the LED light is on. Plug the controller power cord into a wall outlet and then plug the LED power cord into the controller dongle. Assuming you have already set your operating temperature on the controller to 28C , and the ambient temperature of your room is less than that, when you turn on the controller it should be in "heat" mode and the light should come on.
Next grab a glass on warm water (warmer then 28C) and insert the probe into that. You should see the temperature climb on the controller and the LED light will go off.
If it passes these two tests your good to go. When installing in the tank, make sure you mount the probe with a suction cup or other method to the tank wall. The one thing you do not want to happen is to have the probe inadvertent fall out of the tank. This is the one thing that could go wrong with a controller, and would leave the circuit in HEAT mode constantly. Even this should not result in catastrophic failure if your heater in the tank is working properly and is calibrated 1-2 degrees above that of the controller.
Last edited by nc0gnet0; 11-29-2014 at 01:45 PM.
Ex-President-North American Discus Association-NADA
[SIGPIC][/SIGPIC]
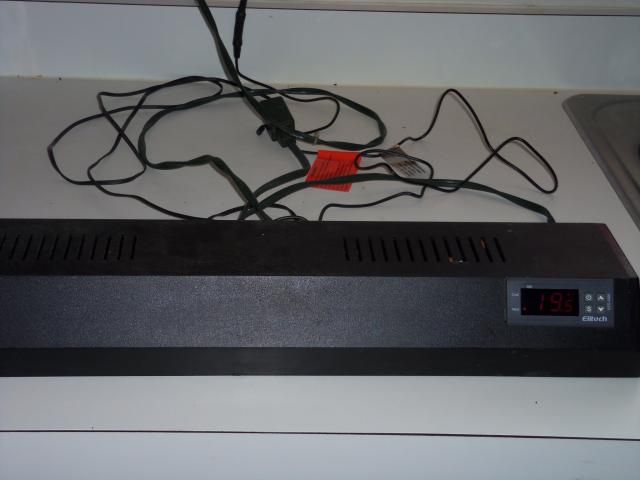
Ok, the controller LED combo is now completely functional. I illustrated it in this way in order to avoid confusion and not to intimidate people that normally would not be comfortable wiring their own controller.
There are however a few options that do increase cost a little bit but tidy things up. The one downfall with the above project is that we have two power cords, a dongle, and a probe all coming out of the back of the hood. Now, if you had a separate light and controller, you would have all of this anyways, but as we have the ability to simply how many outlets we need, why not?
So, in the next day or two I can show you a few "modifications" that will make the wiring slightly more complicated, but still very easy if followed step by step. What I will do is to remove the dongle entirely, and instead install an plug outlet to the back of the enclosure. Your heater will then plug directly to that outlet.
I will also show you how to wire it using only one power cord into the enclosure, and install (actually use the existing switch from the old fixture)a switch to the back of the enclosure to turn the light on and off. The one thing I do not care for with these LED lights is the position they placed the on/off switch. it sits right next to the wallwort (this is the small ac-dc transformer that plugs into the wall), this can sometimes be problematic depending on tank and outlet placement. Another option would be to run a cheap extension cord from the outlet up to the wallwort.
This will "clean up" the clutter considerably without effecting functionality. We would then only have one power cord and one probe cord coming out the back of the hood.
Finally (although Pat kinda stole my thunder
http://www.ebay.com/itm/New-Touch-Pa...item2c8d0a6023
Last edited by nc0gnet0; 11-29-2014 at 01:47 PM.
Ex-President-North American Discus Association-NADA
[SIGPIC][/SIGPIC]
good stuff! if you say those STC-1000s are solid, then I will definitely try them at the very least.
Great DIY project. Thanks

Impressive write up. Thanks for sharing.
Click here to view my 75g Acrylic Tank w/ Bean Animal Overflow with 40g Sump Thread
Also, click here for my 25 group of discus grow out thread
http://i3.cpcache.com/product/162117...ht=75&width=75
Want to look like Al did at his ACA talk with his white Simply Polo shirt?(You can catch Al's awesome Discus talk HERE)
You can get this and many more items such as T-shirts/Polos/hoodies/cups from our merchandise shop:
Cafepress.com
Cool Rick, perhaps after you post your options you can document a diy programmable controller for the LEDs
Your discus are talking to you....are you listening
LOL, doing so would require opening up the LED light strip and making some major modifications for some of the settings you see on most programable LED's (stuff like white only, blue only etc etc.) On/off and timed brightness control is do-able.
Ex-President-North American Discus Association-NADA
[SIGPIC][/SIGPIC]
Got greedy
Your discus are talking to you....are you listening
Here you go Pat:
http://www.ebay.com/itm/CURRENT-USA-...item19e8a57bea
Ex-President-North American Discus Association-NADA
[SIGPIC][/SIGPIC]

Your discus are talking to you....are you listening
You can do some pretty cool stuff with some of the timers, trouble is the project stops becoming a "budget project".
Ex-President-North American Discus Association-NADA
[SIGPIC][/SIGPIC]
I think I shall look into creating a control console for my tanks using these controllers...
I already have the semiauto water change system going up today, having these temperature controllers in a box alongside my water pump switches sounds amazing, everything monitored in one place!
 Posting Permissions
 |